Imagine the convenience of carrying your own portable operating system in your pocket, ready to be used on any computer at a moment's notice. That's the power of a bootable Ubuntu flash drive, and creating one is easier than you might think. With the help of tools like BalenaEtcher, you can transform a regular USB stick into a powerful tool for troubleshooting, system recovery, or just experimenting with a different operating environment.
The beauty of using BalenaEtcher lies in its simplicity and user-friendly interface. Even if you're not particularly tech-savvy, this tool makes it easy to create a bootable Ubuntu flash drive without the need for complicated command line operations or extensive technical knowledge. Whether you're an IT professional looking to streamline your workflow or just someone curious about exploring the world of Linux, learning how to use BalenaEtcher opens up new possibilities for leveraging the power and flexibility of Ubuntu on-the-go.
By harnessing the potential of your everyday USB stick with BalenaEtcher, you'll be equipped with an invaluable tool that can serve as both a lifeline in emergency situations and an exciting gateway into the world of open-source software. These innovative solutions are empowering individuals and organizations alike to break free from traditional computing constraints and embrace the future of portable technology.
Table of Contents
- 1 What is a bootable Ubuntu flash drive?
- 2 Benefits of creating a bootable flash drive
- 3 Overview of BalenaEtcher
- 4 BalenaEtcher Key Features
- 5 How to Create a Bootable Ubuntu Flash Drive: Step-by-Step Guide
- 6 What you need to create a bootable Ubuntu flash drive
- 7 Testing A bootable flash drive
- 8 Downloading and installing BalenaEtcher
- 9 Creating the bootable flash drive
- 10 Selecting the Ubuntu ISO file
- 11 Choosing the flash drive to use
- 12 Creating the Bootable Drive
- 13 Flashing the Ubuntu image onto the drive
- 14 Verifying the bootable flash drive
- 15 Advantages of using BalenaEtcher for creating bootable drives
- 16 Recap
What is a bootable Ubuntu flash drive?
A bootable Ubuntu flash drive is a powerful tool that allows users to run the Ubuntu operating system directly from a USB drive, without needing to install it on their computer’s hard drive. This provides the flexibility to test out Ubuntu or use it on different computers without the need for installation. The ability to run a full-fledged operating system from a portable flash drive opens up new possibilities for developers, IT professionals, and enthusiasts who want to explore Ubuntu's features and capabilities on the go.

Creating a bootable Ubuntu flash drive requires specialized software such as BalenaEtcher, which simplifies the process by handling tasks like formatting the drive and copying over the necessary files. It’s an accessible way for both beginners and experienced users to harness the power of Ubuntu on any compatible device. Whether you’re looking to troubleshoot computer issues, experiment with different software environments, or simply enjoy the convenience of carrying an entire OS in your pocket, a bootable Ubuntu flash drive offers endless potential and convenience.
Benefits of creating a bootable flash drive
Creating a bootable flash drive offers a myriad of benefits that make it a valuable tool for both tech enthusiasts and everyday users. One of the key advantages is the portability it provides, allowing you to carry your operating system and important files with you wherever you go. This means you can easily access your customized environment on any computer without having to install anything, offering unparalleled convenience for remote work or troubleshooting purposes.
Moreover, creating a bootable flash drive enables quick and seamless installations of operating systems such as Ubuntu. Whether you need to perform a fresh installation or troubleshoot an existing system, having a bootable flash drive at your disposal can save time and effort. It also serves as an excellent backup solution in case of system crashes or malfunctions, providing reassurance that your essential data is always within reach. By harnessing the power of BalenaEtcher, users can effortlessly transform their flash drives into versatile tools that redefine the way they interact with technology.
Overview of BalenaEtcher
BalenaEtcher has revolutionized the process of creating bootable USB drives, simplifying the task for both beginners and seasoned tech enthusiasts. With its intuitive interface and robust capabilities, it has become the go-to tool for anyone looking to create reliable and efficient bootable drives. One of the key advantages of BalenaEtcher is its cross-platform compatibility, making it suitable for Windows, macOS, and Linux users alike. This ensures that no matter your operating system preference, you can rely on BalenaEtcher to get the job done efficiently.

Furthermore, BalenaEtcher's validation feature sets it apart from other similar tools in the market. By verifying the integrity of the written data, it provides an added layer of assurance that your bootable drive will perform flawlessly when needed. This attention to detail not only inspires confidence but also saves time by reducing potential errors that often arise with traditional methods of creating bootable drives. Overall, BalenaEtcher's user-friendly approach combined with its robust features makes it an indispensable tool for anyone looking to create a reliable Ubuntu flash drive or any other bootable media.
BalenaEtcher Key Features
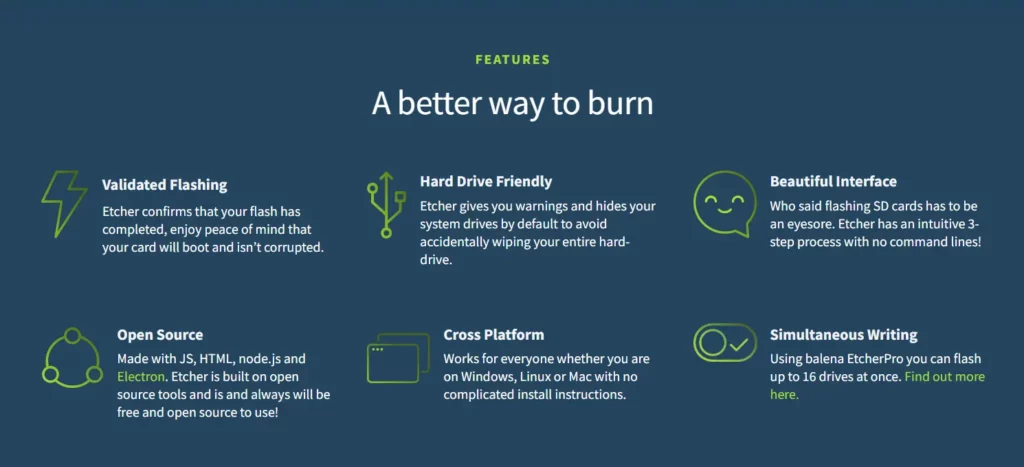
- Validated Flashing:
- Ensures the completion of the flash process, providing peace of mind about successful boots.
- Hard Drive Friendly:
- Warns users and hides system drives by default to prevent accidental data loss.
- Beautiful Interface:
- Intuitive 3-step process, eliminating the need for complex command lines.
- Open Source:
- Built with JS, HTML, node.js, and Electron, emphasizing a commitment to being free and open source.
- Cross Platform:
- Works seamlessly on Windows, Linux, and Mac with straightforward installation instructions.
- Simultaneous Writing:
- EtcherPro allows users to flash up to 16 drives simultaneously, enhancing efficiency.
How to Create a Bootable Ubuntu Flash Drive: Step-by-Step Guide
In the step-by-step guide to creating a bootable Ubuntu flash drive using Balenaetcher, the first crucial step is to download the necessary tools: Balenaetcher and the Ubuntu operating system ISO file. Once downloaded, launch Balenaetcher and insert your USB flash drive into your computer. Next, select the Ubuntu ISO file within Balenaetcher and choose your USB flash drive as the target.
After selecting your USB flash drive, simply click ‘Flash' in Balenaetcher to begin writing the Ubuntu image onto your USB drive. This process may take some time depending on the speed of your computer and USB drive. Once finished, safely eject your newly created bootable Ubuntu flash drive from your computer, and it’s ready for use! With these straightforward steps, you can create a reliable Ubuntu bootable flash drive using Balenaetcher with ease.
Creating a bootable Ubuntu flash drive empowers you with a portable Linux environment that can be utilized for various purposes such as troubleshooting PC issues or testing out new software without installing it directly on your machine. By following this step-by-step guide using Balenaetcher, you not only gain valuable knowledge about creating bootable drives but also open up new possibilities for utilizing technology to solve problems and expand your computing capabilities.
What you need to create a bootable Ubuntu flash drive
To create a bootable Ubuntu flash drive, you'll need the following:
- A USB flash drive (8GB or larger)
- A copy of the Ubuntu ISO image
- BalenaEtcher
Download Ubuntu ISO image
The Ubuntu ISO image is the file that contains the Ubuntu operating system. You can download it from the Ubuntu website below.
Testing A bootable flash drive
Once the bootable flash drive has been created, you can test it by following these steps:
- Power on your computer and insert the bootable flash drive.
- Press the F12 key or the ESC key to open the boot menu.
- Select the USB flash drive from the boot menu.
Your computer will now boot from the Ubuntu flash drive. You can now install Ubuntu or try it out in live mode.
Downloading and installing BalenaEtcher
BalenaEtcher is a free and open-source software application that can be used to create bootable USB drives. You can download it from the BalenaEtcher website.
Downloading and installing BalenaEtcher is a breeze, making it an essential tool for creating bootable USB drives. Simply head to the official BalenaEtcher website and choose the version compatible with your operating system. Whether you're using Windows, macOS, or Linux, there's a version of BalenaEtcher for you. Once downloaded, the installation process is straightforward and intuitive, guiding you through each step with ease.
One of the key advantages of using BalenaEtcher is its sleek and user-friendly interface. Unlike other USB creation tools that can be cumbersome to navigate, BalenaEtcher simplifies the process with its clean design and minimalist approach. This makes it perfect for beginners and seasoned tech enthusiasts alike. Additionally, its cross-platform compatibility ensures that users across different operating systems can benefit from its functionality without encountering any compatibility issues. With such simplicity in downloading and installing BalenaEtcher, creating a bootable Ubuntu flash drive becomes an effortless task for anyone looking to dive into the world of Linux.
Creating the bootable flash drive
Once you have downloaded BalenaEtcher and the Ubuntu ISO image, you can follow these steps to create a bootable Ubuntu flash drive:
- Open BalenaEtcher.
- Click the Select Image button and select the Ubuntu ISO image.
- Click the Select Device button and select the USB flash drive.
- Click the Flash button.
BalenaEtcher will now create the bootable Ubuntu flash drive. This process may take a few minutes.
Selecting the Ubuntu ISO file
When selecting the Ubuntu ISO file for creating a bootable flash drive, it's crucial to ensure compatibility with your system architecture. This entails choosing between 32-bit and 64-bit versions based on the specifications of your computer. Additionally, consider the release version of Ubuntu you intend to use, as newer releases may offer updated features and security patches. For instance, if you prioritize stability and long-term support, opting for an LTS (Long Term Support) release would be advisable.
Furthermore, take into account any specific requirements or customizations that may be needed for your intended use of Ubuntu. Certain editions such as Ubuntu Server, Ubuntu Desktop, or specialized variants like Kubuntu or Xubuntu are tailored to different purposes and user preferences. Understanding these distinctions can help in selecting an ISO file that fulfills your individual needs while ensuring a seamless installation process onto the bootable flash drive.
Choosing the flash drive to use
When it comes to choosing the right flash drive for creating a bootable Ubuntu, there are several factors to consider. First and foremost, ensure that the flash drive has sufficient storage capacity to hold the Ubuntu installation files. A minimum of 8GB is recommended, but opting for a larger capacity can offer more flexibility for future use.
In addition to capacity, pay attention to the read and write speeds of the flash drive. Selecting a USB 3.0 or higher model can significantly reduce data transfer times during the creation of the bootable drive and improve overall system performance when running Ubuntu from the flash drive.
Furthermore, consider durability and reliability when selecting a flash drive. Look for models with robust build quality and good track records for longevity. The last thing you want is to invest time in creating your bootable Ubuntu only to have it fail due to a faulty or flimsy flash drive. By prioritizing capacity, speed, and reliability in your selection process, you can ensure a smooth experience when creating and using your bootable Ubuntu flash drive with BalenaEtcher.
Creating the Bootable Drive
Creating a bootable drive is an essential skill for any tech-savvy individual. Whether you're installing a new operating system or troubleshooting a problematic computer, having a bootable drive at your disposal can be a real lifesaver. With tools like BalenaEtcher, the process has become more convenient and user-friendly than ever before.
One of the key advantages of using BalenaEtcher is its simple and intuitive interface. Even beginners can easily create bootable drives without getting lost in complicated settings or technical jargon. By simplifying the process, BalenaEtcher empowers users to focus on their objectives rather than struggling with the tool itself.
Another benefit of creating a bootable drive using BalenaEtcher is its cross-platform compatibility. Whether you're using Windows, macOS, or Linux, BalenaEtcher provides consistent performance and reliability across different operating systems. This makes it an invaluable tool for individuals who work with diverse platforms and need a consistent solution for creating bootable drives.
Flashing the Ubuntu image onto the drive
Flashing the Ubuntu image onto the drive is a crucial step in creating a bootable Ubuntu flash drive using BalenaEtcher. This process involves transferring the Ubuntu image file to a USB drive, allowing you to install or try out Ubuntu on another computer. One important consideration when flashing the image is ensuring that you select the correct USB drive to avoid overwriting any important data on other drives.
BalenaEtcher's user-friendly interface makes flashing the Ubuntu image onto the drive a seamless experience. With its simple steps and intuitive design, even beginners can quickly master this process. Additionally, by using BalenaEtcher, users benefit from its verification feature, which ensures that the flashed image is correctly written to the USB drive without errors, providing peace of mind and confidence in your bootable USB creation.
In conclusion, flashing the Ubuntu image onto a drive with BalenaEtcher empowers users to create reliable and efficient bootable USB drives for installing or trying out Ubuntu. The streamlined process and validation features make it an essential tool for anyone looking to explore or install this popular Linux operating system.
Verifying the bootable flash drive
After creating a bootable Ubuntu flash drive using BalenaEtcher, the next crucial step is to verify its bootability. This ensures that the flash drive is correctly configured and ready to be used as a bootable device. Verifying the bootable flash drive involves checking if the files were properly copied, ensuring that the bootloader was successfully installed, and confirming that the drive can be recognized by the computer's BIOS.
One effective way to verify the bootable flash drive is by attempting to boot from it on a spare computer or laptop. This real-world test will confirm whether the flash drive functions as intended and can successfully initiate the Ubuntu installation process. Additionally, checking the file system of the flash drive using a disk management tool can also provide valuable insights into its bootability status. By methodically verifying these key components, you can ensure that your bootable Ubuntu flash drive is prepared for seamless deployment and use.
In conclusion, verifying a bootable flash drive serves as a critical quality check before attempting any installations or system upgrades. It's a small yet essential step that guarantees everything is in order before relying on this important tool for accessing or installing an operating system such as Ubuntu. With proper verification procedures in place, users can proceed with confidence knowing their flash drives are reliable and capable of fulfilling their intended purpose.
Advantages of using BalenaEtcher for creating bootable drives
When it comes to creating bootable drives, BalenaEtcher stands out as a reliable and efficient tool with numerous advantages. One key benefit is its user-friendly interface, which makes the entire process of creating bootable drives incredibly simple and straightforward. This means even those who are not tech-savvy can easily use BalenaEtcher to create bootable drives without the complexity often associated with other methods.
Another advantage of using BalenaEtcher is its cross-platform compatibility. Whether you're using a Windows, macOS, or Linux system, BalenaEtcher has got you covered. This flexibility allows users to seamlessly create bootable drives on different operating systems, eliminating the need for multiple tools or software installations. Furthermore, BalenaEtcher ensures data integrity by verifying the writing process to prevent any potential errors, providing peace of mind that your bootable drive is created accurately and reliably every time.
In conclusion, when it comes to creating bootable drives for various purposes such as installing an operating system or running diagnostics on a computer, BalenaEtcher proves to be a valuable tool with its intuitive interface and cross-platform capabilities. Its reliability in maintaining data integrity further cements its position as the go-to solution for creating bootable drives across different operating systems.
Recap
In conclusion, creating a bootable Ubuntu flash drive using BalenaEtcher is a simple and effective way to harness the power of this popular Linux distribution. By following the step-by-step guide provided in this article, users can seamlessly turn their USB drives into portable Ubuntu installations, ready for use on any compatible device. The flexibility and versatility offered by a bootable Ubuntu flash drive make it an invaluable tool for both experienced Linux enthusiasts and beginners looking to explore the world of open-source computing.
Furthermore, the ability to carry Ubuntu with you wherever you go opens up a myriad of possibilities, from troubleshooting and system recovery to accessing your personalized environment on any computer. With BalenaEtcher's user-friendly interface and efficient processing capabilities, the process becomes effortless even for those less familiar with creating bootable drives. Ultimately, embracing the potential of a bootable Ubuntu flash drive signifies stepping into a world where freedom and innovation coexist, empowering users to take control of their computing experience while pushing boundaries in pursuit of new horizons.


Hey there! 🚀 Ready to unleash the power of Ubuntu on the go?
🌐💻 Check out this awesome guide on creating a bootable Ubuntu flash drive using BalenaEtcher. It’s a game-changer for troubleshooting, system recovery, or just exploring Linux! 🔧🔍 Don’t miss out on the tech magic! Follow and like Raqmedia for more tips and tricks! 🌟👍
.
Read it here: https://bit.ly/ubntuusb
.
#raqmedia #Ubuntu #BalenaEtcher #LinuxMagic #TechTips #OpenSource #ExploreWithLinux #TechInYourPocket