Embarking on the journey of running Python projects obtained from GitHub opens a door to a plethora of possibilities for Python enthusiasts, GitHub aficionados, and aspiring software developers alike. How to run Python projects downloaded from GitHub like a pro! Follow our comprehensive tips and tricks for smooth project execution today!
Among the vast collection of open-source projects, lies the challenge of successfully executing and utilizing these valuable resources. Therefore, understanding and implementing the essential steps outlined in this article will serve as your guiding compass through this exciting terrain.
Table of Contents
- 1 How to Run Python Projects Downloaded From GitHub
- 2 Setting up Your Environment
- 3 Cloning the GitHub Repository
- 4 Installing Project Dependencies
- 5 Configuring Environment Variables
- 6 Running Tests and Linting
- 7 Making Changes and Committing
- 8 Pull Requests and Collaboration
- 9 Final Thoughts
- 10 FAQs
- 10.1 1. How do I handle conflicts during a pull request merge?
- 10.2 2. Can I contribute to a project on GitHub without any coding experience?
- 10.3 3. What should I do if I encounter errors while installing project dependencies?
- 10.4 4. How often should I commit changes while working on a GitHub project?
- 10.5 5. Is it necessary to run all tests provided by a project before making changes?
- 10.6 6. Should I update my forked repository regularly with changes from the original repository?
- 10.7 7. How do I share my observations about potential improvements in a GitHub project with maintainers?
How to Run Python Projects Downloaded From GitHub
In the world of coding, precision is key. Every line of code contributes to the functionality and integrity of a project. When diving into Python projects sourced from GitHub, it is paramount to meticulously follow a set of crucial steps to ensure that your endeavor unfolds smoothly.

Whether you are new to Python or well-versed in its syntax, adhering to these fundamental guidelines will not only guarantee a seamless run but also foster an environment where innovation thrives. So, let's delve into the realm of GitHub Python projects with an arsenal of knowledge that will empower you on this coding odyssey.
Setting up Your Environment
Before diving into a GitHub Python project, ensure you have the right setup in place to streamline your work process. Start by installing Python, the backbone of most projects. Head over to the official Python website and download the latest version compatible with your operating system. The installation process is usually straightforward, following on-screen instructions will get Python up and running on your machine.
Next, pick a code editor that aligns with your preferences and supports Python syntax highlighting and code linting for better development experience. Popular choices like Visual Studio Code, PyCharm, or Atom offer features that can boost your productivity when working on GitHub Python projects. Familiarize yourself with the editor's shortcuts and customization options for smoother coding sessions.
To manage dependencies efficiently without interfering with other projects' setups, create a virtual environment using virtualenv or venv module if you're on Python 3. This isolated workspace allows you to install project-specific packages without cluttering your global Python environment. By segregating dependencies, you avoid version conflicts and maintain a clean environment tailored to the GitHub project you are working on.
Cloning the GitHub Repository
Cloning a GitHub repository is a fundamental step in working on projects sourced from the platform. To clone a repository, you can use Git commands in your terminal or employ the user-friendly interface of GitHub Desktop. For instance, using Git, you would navigate to your desired directory and run “git clone ” to download the project locally. With GitHub Desktop, it's as simple as selecting “Clone a Repository” and pasting the URL.
Ensuring that the cloning process is successful is crucial before beginning any modifications. A common pitfall when cloning is forgetting to navigate into the newly created project folder after execution. By double-checking that all files and directories have been correctly transferred, you avoid potential confusion later on. Once cloned, take some time to explore the structure and contents of the project; understanding how different components relate will significantly aid your workflow.
For instance, imagine you're cloning a Python project focused on data visualization from GitHub. After successfully cloning it using Git commands, make sure all necessary files like datasets or configuration scripts are present in your local copy. Familiarizing yourself with where specific functionalities reside within the project can save time when making modifications or troubleshooting later stages of development.
Installing Project Dependencies
After successfully cloning the GitHub repository, the next vital step in running a Python project is installing all necessary dependencies. Before proceeding, it's crucial to refer to the project documentation to identify specific libraries or requirements needed for the project to function correctly. By understanding and satisfying these dependencies, you can ensure smooth execution without encountering runtime errors later on.
To install these dependencies, Python offers two popular tools: pip and conda. For projects that provide a `requirements.txt` file or an `environment.yaml` file containing a list of required packages, using pip or conda simplifies the installation process significantly. Using one of these package managers, you can swiftly install all essential libraries by executing a single command in your terminal.
Once the installation is complete, it is important to verify that all required dependencies have been installed correctly. You can check this by referring back to the documentation or attempting to run the project after installation. Verifying successful dependency installation helps in preemptively rectifying any issues before they manifest during project execution, saving time and hassle further down the line.
Configuring Environment Variables
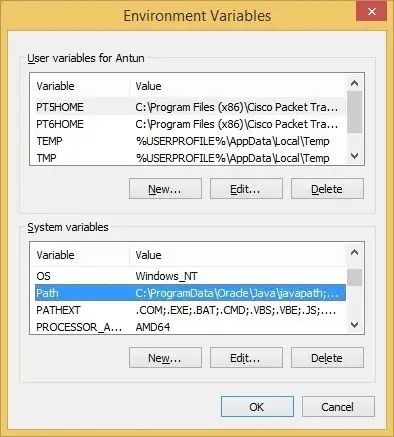
Before diving into running a Python project downloaded from GitHub, it’s crucial to configure the necessary environment variables for seamless execution. Start by identifying if the project requires any specific environmental settings to run correctly; these could include database URLs, API keys, or application-specific configurations. Once identified, you can set up these variables directly on your system or utilize a configuration file within the project directory.

For instance, if you're working on a Django project that requires a secret key for security measures, you would need to set this key as an environment variable. By doing so, you ensure that sensitive information is not hard-coded in your codebase and can be easily managed across different environments. Testing the configuration is equally important – verifying that the project reads these variables ensures that your setup is correct and ready for usage.
In practice, consider a machine learning project that relies on access tokens for external APIs. Configuring these tokens as environment variables shields them from accidental exposure in your code while allowing for easier management when switching between development and production environments. By testing whether the project can indeed access these variables as intended, you guarantee smooth functioning without runtime errors stemming from misconfigurations.
Running Tests and Linting
Once you have configured your environment variables, it's time to ensure the project's functionality by running tests and maintaining code quality through linting. Running tests is crucial to verify that the project behaves as expected and catches any potential bugs early on. Look for specific instructions on how to run tests in the project's documentation or codebase, typically done using testing frameworks like pytest or unittest.
When it comes to keeping your code clean and maintainable, linters like Flake8 or Pylint come to the rescue. These tools analyze your Python code for any deviations from coding standards, potential errors, or style guide violations. By running a linter on your project files, you can ensure consistency across the codebase and catch common programming mistakes.
If any tests fail or linting issues are reported, address them before proceeding with further modifications. It's essential to fix failing tests promptly since they indicate areas where the project might not be functioning correctly. Similarly, resolving linting errors ensures that your code adheres to best practices and is easier to read by collaborators working on the project.
By incorporating test-driven development practices and regular linting into your workflow, you not only improve the reliability of the project but also make future contributions smoother. Remember, running tests and using linters are proactive measures that contribute significantly to the overall health of a GitHub Python project in terms of stability and readability.
Making Changes and Committing
After running tests and ensuring your project meets the required standards, it's time to make changes or add features to tailor the GitHub Python project to your needs. Whether you're fixing bugs or enhancing functionality, modifying the codebase is a crucial step in your development process. Before anything else, ensure that you are working on a separate branch to keep the main branch clean and functional for other contributors.
When you are ready to commit your changes, use Git commands such as `git add .` to stage your modifications and `git commit -m “Clear and concise message”` to commit them locally. Writing informative commit messages is essential not only for tracking changes but also for helping collaborators understand the purpose behind each modification. For example, instead of just saying “Updated code,” a more explanatory message like “Fixed issue #123 by updating function parameters” provides context.
Imagine you are working on an open-source weather application downloaded from GitHub. If you decide to add a feature that allows users to switch between Celsius and Fahrenheit units easily, clearly describing this enhancement in your commit message will help others comprehend the intent of your contribution without having to dig through the code themselves. Remember, clear communication through commits fosters efficient collaboration within repositories.
Once you have committed your changes locally, proceed by pushing them to your forked repository on GitHub using `git push origin `. By following these steps diligently, not only do you streamline version control processes, but you also contribute positively towards maintaining an organized and documented codebase that benefits both current and future developers working on the project.
Pull Requests and Collaboration
Once you have made the necessary changes to the GitHub Python project, it's time to integrate your work with the main project through pull requests. Creating a pull request signals that you are ready for your modifications to be reviewed and potentially merged into the main branch. When initiating a pull request, provide a clear description of the changes you've made and why they are beneficial.
Requesting reviews from collaborators or maintainers is crucial as they can offer valuable feedback on your contributions. By engaging in this collaborative process, you not only improve the overall quality of the project but also learn from others' expertise. For example, if you added a new feature to a data analysis tool, a senior developer could provide insights on optimizing its performance or enhancing user experience.
Respond promptly to comments received during the review process and be open to making further adjustments based on feedback provided. Remember that code review is an essential part of maintaining code quality and ensuring consistency within the project. Consider it as an opportunity for growth and refinement rather than criticism. By actively participating in discussions and applying suggestions for improvement, you demonstrate your commitment to producing high-quality code.
By actively engaging in pull requests and collaborating with others on GitHub projects, you not only contribute to open-source initiatives but also enhance your skills as a developer. Always aim for constructive dialogue during reviews, address any concerns raised professionally, and keep an open mind towards different perspectives. This iterative process of collaboration leads to stronger projects, fosters a sense of community among contributors, and sets a positive example for effective teamwork within software development environments.
Final Thoughts
Successfully running GitHub Python projects entails a series of crucial steps that ensure a smooth and collaborative workflow. By following the outlined procedures meticulously, you not only enhance your project management skills but also contribute effectively to the open-source community. Remember, attention to detail and adherence to best practices are key elements in fostering a positive development environment.
Emphasizing the significance of thorough testing and adherence to coding standards cannot be overstated. Utilizing linters and running tests regularly helps maintain code quality across contributions, enabling seamless integration within the repository. For example, by consistently utilizing Flake8 or Pylint on your Python projects, you can identify and rectify any deviations from established coding guidelines promptly.
Furthermore, active participation in pull requests and embracing feedback mechanisms are instrumental in refining your programming skills while collaborating with peers. Think of engaging in pull requests as an opportunity for growth – through constructive criticism and peer review, you not only enhance your project but also expand your knowledge base by learning from others' expertise.
FAQs
1. How do I handle conflicts during a pull request merge?
– Conflicts usually occur when the same code line is modified independently by two contributors. To resolve conflicts, you need to manually compare changes or use tools like Git's three-way merge. Follow the prompts given by Git to resolve conflicts systematically.
2. Can I contribute to a project on GitHub without any coding experience?
– Yes! You can contribute by raising issues if you encounter bugs or suggesting enhancements for a project. Additionally, documentation improvements are valuable contributions that don't require coding skills.
3. What should I do if I encounter errors while installing project dependencies?
– Check the error messages provided during the installation process as they often give clues on how to resolve dependency issues. You can also search online forums like Stack Overflow for solutions or reach out to the project maintainers for assistance.
4. How often should I commit changes while working on a GitHub project?
– It's recommended to make smaller commits frequently rather than large commits infrequently. This practice helps in tracking changes effectively and makes it easier to pinpoint issues introduced at specific points in development.
5. Is it necessary to run all tests provided by a project before making changes?
– Running tests ensures that your modifications do not break existing functionality unintentionally. While it may seem time-consuming initially, running tests preemptively saves time in debugging errors later on.
6. Should I update my forked repository regularly with changes from the original repository?
– Yes! Regularly syncing your forked repository with updates from the original repository helps you stay current with developments in the main project and reduces merge conflicts when submitting pull requests.
– You can communicate your suggestions through issue comments or create pull requests that implement proposed changes directly into the project codebase for review by maintainers and collaborators.


How to run Python projects downloaded from GitHub? Unlock the secrets to executing your favorite repositories with our easy-to-follow guide!