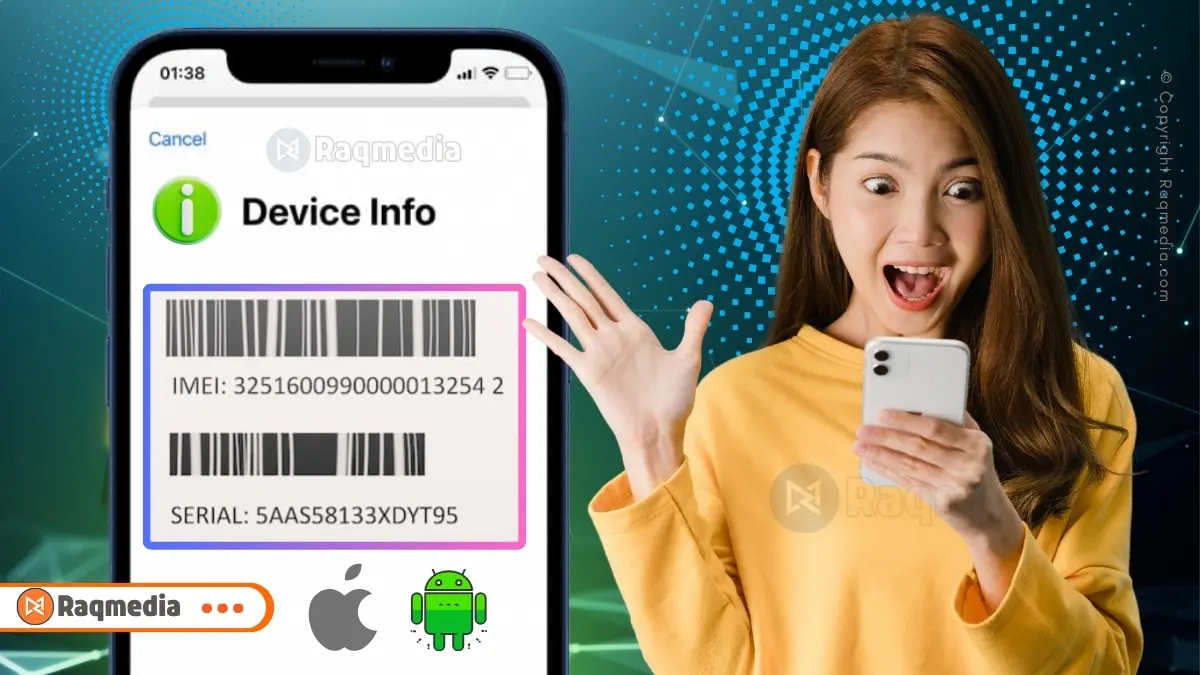
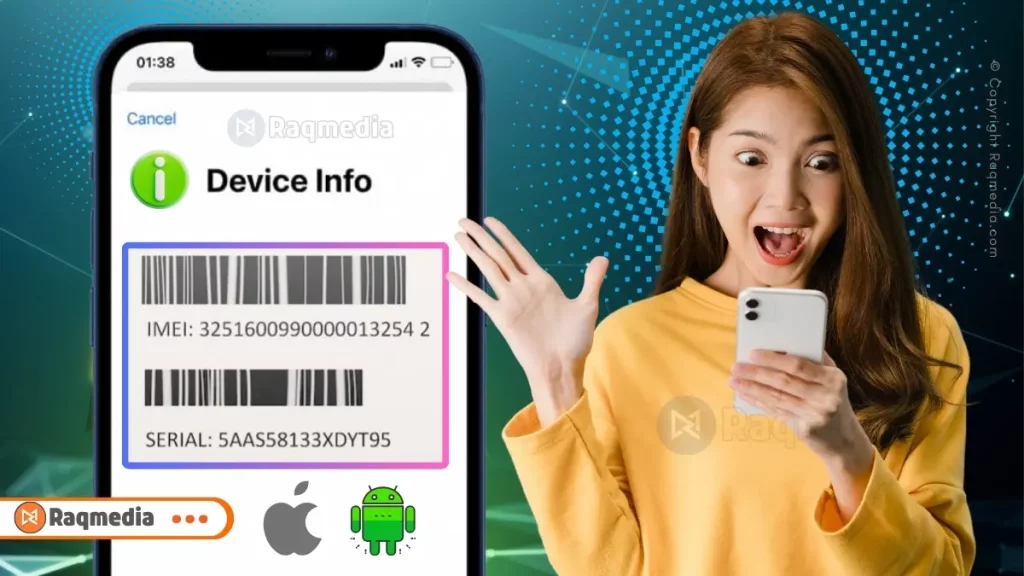
A few years ago, my phone got stolen. Panic set in – photos, contacts, messages – all gone. But then I remembered something: the IMEI number. That tiny 15-digit code became my lifeline to tracking (and eventually blocking) my stolen device.
What Is IMEI? Your Phone’s Secret ID: How to Find IMEI on a Lost Device
If you’ve never heard of IMEI or don’t know why it matters, you’re not alone. Most people ignore it until disaster strikes. But trust me, understanding your phone’s IMEI is like having a secret weapon against theft, fraud, or even just buying a used phone safely.
What Is IMEI? Your Phone’s Secret ID
In this guide, I’ll break down:
– What an IMEI number actually is (and why it’s more important than you think)
– How to find your IMEI number on Android & iPhone (even without the phone in hand)
– What to do if your phone is lost or stolen (using IMEI to protect yourself)
Let’s get into it.
What Is an IMEI Number?
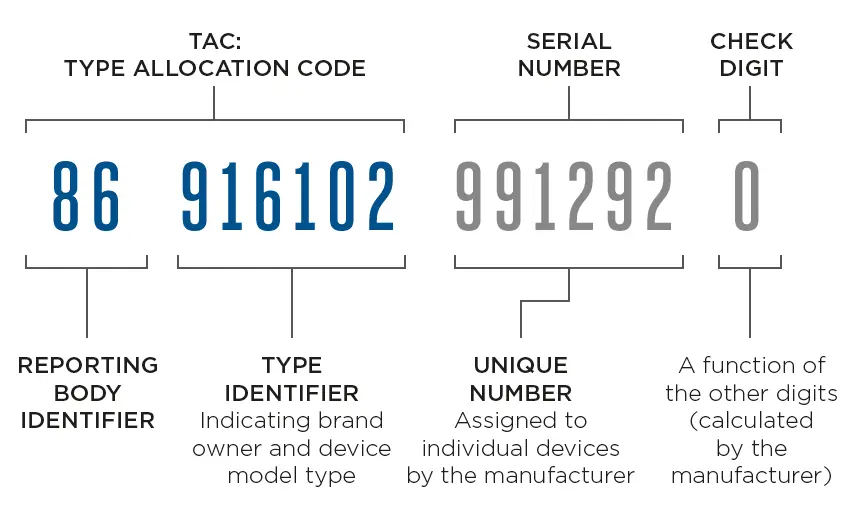
IMEI stands for International Mobile Equipment Identity. Think of it like your phone’s fingerprint – no two devices have the same one. It’s a 15-digit code that identifies your specific device (not your number or SIM card).
Why Does IMEI Matter?
– Track or block a stolen phone: Report the IMEI to your carrier, and they can blacklist it, making the phone useless on any network.
– Check if a used phone is stolen: Before buying secondhand, verify the IMEI to ensure it’s not blocked.
– Warranty & repairs: Manufacturers use IMEI to check your device’s warranty status.
– Police reports: If your phone is stolen, authorities can use the IMEI to track it down.
Bottom line: Your IMEI is your phone’s ultimate ID. Keep it safe (but not _too_ public—more on that later).
How to Find Your IMEI Number (Android & iPhone)
1. On an Android Phone
– Dial `#06#`: The IMEI pops up instantly. No need to press call.
– Settings > About Phone: Scroll to “IMEI” or “Status.”
– Check the SIM tray or back cover: Some phones print the IMEI there.
– Original box or receipt: The IMEI is usually on the barcode label.
2. On an iPhone
– Dial “#06#“: Works just like Android.
– Settings > General > About: Scroll down to find IMEI.
– SIM tray (older iPhones): The number might be etched on the tray.
– Back of the phone (iPhone 6s and older): Printed near the bottom.
– iCloud.com: If your phone is lost, log in, go to “Find My iPhone,” and check device details.
– iPhone: Visit [iCloud.com/find](https://www.icloud.com/find), log in, and click your device for the IMEI.
– Old phone boxes or receipts: Retailers often print the IMEI on receipts.
– Your carrier: Call them—they might have it on file if you’ve used the phone with their SIM.
What to Do If Your Phone Is Stolen (Using IMEI)
1. Report to your carrier immediately – Give them the IMEI to block the device from being used.
2. File a police report – Some countries have databases for stolen IMEIs.
3. Track it (if possible) – Use Find My Device (Android) or Find My iPhone, but don’t confront thieves yourself.
4. Check IMEI databases later – Sites like [IMEI.info] can tell you if your phone pops up elsewhere.
⚠️ Warning: Never share your IMEI publicly (like on social media). Scammers can misuse it to clone phones or fake ownership.
Key Takeaways
✔️ IMEI = Your phone’s unique ID (15 digits, never changes). ✔️ Find it by dialing `#06#`, checking settings, or looking on the box. ✔️ Lost phone? Use Google/iCloud or call your carrier to retrieve the IMEI. ✔️ Stolen? Report the IMEI to block the phone and file a police report. ✔️ Never post your IMEI online—it’s like giving away your phone’s social security number.
FAQs About IMEI Numbers
Q: Can two phones have the same IMEI?
A: No. If they do, one is likely a counterfeit or cloned device.
Q: Can I change my IMEI?
A: Technically possible but illegal in most countries. Tampering with IMEI can lead to fines or jail time.
Q: Does removing the SIM card change the IMEI?
A: Nope. IMEI is tied to the phone hardware, not the SIM.
Q: Can IMEI be used to track a phone’s exact location?
A: Not directly. Carriers can see which tower the phone is using, but only law enforcement can access that data.
Final Thoughts
Your IMEI number might seem like a random string of digits, but it’s one of the most powerful tools you have if your phone goes missing. I learned this the hard way, but you don’t have to.
Take 30 seconds right now to find your IMEI (try `#06#`) and save it somewhere safe—not on your phone. A stolen device is stressful enough without scrambling to find its ID.
Got questions? Drop them below. And if you’ve ever used your IMEI to recover a phone, share your story – it might help someone else!
Did you know that nearly 40% of professionals use video conferencing tools like Google Meet for their daily meetings? If you’ve ever found yourself wishing you could capture those important discussions without breaking the bank, you’re in luck! In this comprehensive guide, we’ll dive into how to record Google Meet free, ensuring you never miss a crucial moment again.
By the end of this article, you’ll be equipped with all the tips and tricks needed to effortlessly save your virtual meetings for future reference.
How To Record a Meeting In Google Meet Free: A Comprehensive Guide
Recording Google Meet sessions is essential for capturing important discussions, training sessions, or meetings that you might need to revisit later. Whether it’s for personal use, educational purposes, or business needs, recording these sessions can enhance productivity and ensure no critical information is lost.
Platforms like Google Meet offer seamless communication but lack built-in free recording options. However, there are several third-party tools available that make this process easy and cost-effective.
Tools such as OBS Studio (https://obsproject.com/ ) and Loom (https://www.loom.com/ ) provide robust features for recording your screen during a Google Meet session. In this guide, we will explore various methods to record Google Meet for free, ensuring you have all the necessary resources at your fingertips.
Browser extensions offer a convenient way to record Google Meet sessions directly from your web browser without needing additional software. Extensions like Screenity and Nimbus Screenshot & Screen Video Recorder provide intuitive interfaces and straightforward functionality. To use these extensions, simply install them from the Chrome Web Store and follow the setup instructions provided. These tools allow you to record both your screen and audio while participating in Google Meet sessions. They also offer features like trimming, annotations, and sharing options, making them versatile for various recording needs. Remember to check the extension permissions and ensure they align with your privacy requirements before proceeding with installation.
Exploring Mobile Apps for Recording Google Meet
For users who prefer mobile devices, several apps are available to record Google Meet sessions on smartphones and tablets. Apps like AZ Screen Recorder for Android and DU Recorder for iOS provide comprehensive recording capabilities. These apps allow you to capture your screen along with audio during Google Meet sessions, ensuring you don’t miss any crucial details.
They often include additional features such as video editing, screen casting, and cloud storage integration, enhancing their usability. When choosing a mobile app, consider factors like file size limitations, ad presence, and user interface design to select the best option for your needs. Always review app permissions carefully to protect your data and privacy.
Tips for Enhancing Your Google Meet Recording Quality
Improving the quality of your Google Meet recordings involves optimizing both audio and video aspects. Start by using a high-quality microphone to ensure clear audio capture, which significantly enhances the listening experience for viewers. External microphones like the Blue Yeti offer superior sound quality compared to built-in laptop mics. Similarly, invest in a good webcam or use natural lighting to improve video clarity. Position your camera at eye level and avoid backlighting to prevent glare.
How To Record a Meeting In Google Meet
Additionally, close unnecessary applications running in the background to allocate more processing power to your recording software. Regularly update your operating system and drivers to maintain optimal performance levels. By following these tips, you can produce professional-grade recordings that engage your audience effectively.
Addressing Common Issues During Google Meet Recordings
Encountering issues during Google Meet recordings is not uncommon, but understanding how to troubleshoot them can save time and frustration. One frequent problem is poor audio quality, which can result from background noise or suboptimal microphone settings.
To resolve this:
Test different microphones and adjust their sensitivity levels within your recording software.
Another challenge is screen lag or freezing, typically caused by insufficient bandwidth or outdated hardware.
Ensure a stable internet connection and restart your device if necessary.
If your recording stops unexpectedly, verify that your software has sufficient disk space and check for any conflicting processes.
Refer to online forums or support communities related to your chosen tool for specific solutions.
Keeping your software updated with the latest patches can also help mitigate potential problems.
Best Practices for Sharing and Storing Recorded Google Meet Sessions
Once you’ve recorded your Google Meet session, it’s crucial to store and share the files securely and efficiently. Begin by organizing your recordings into clearly labeled folders based on date, topic, or participants for easy retrieval. Use cloud storage services like Google Drive or Dropbox to back up your files, ensuring accessibility across multiple devices. When sharing recordings, consider compressing large files to reduce upload times and optimize viewer loading speeds.
Tools like Handbrake can help convert video formats and compress files without significant quality loss. Always respect participant privacy by obtaining consent before distributing recordings and implementing password protection if sensitive information is involved. Lastly, monitor analytics provided by sharing platforms to gauge engagement and gather feedback.
Future Trends in Google Meet Recording Technology
The landscape of Google Meet recording technology continues to evolve rapidly, driven by advancements in AI and machine learning. Emerging trends include automated transcription services that convert spoken words into text, enabling easier searchability and accessibility for users with hearing impairments. Tools like Otter.ai already offer real-time transcription capabilities integrated with Google Meet. Another promising development is augmented reality overlays, allowing presenters to incorporate interactive elements directly into their recordings.
As remote work and virtual collaboration become more prevalent, expect increased demand for secure, scalable recording solutions tailored to enterprise environments. Developers are also focusing on improving synchronization between audio and video streams, reducing latency issues, and enhancing overall user experience through intuitive interfaces and customizable features.
Wrapping Up
To wrap things up, recording Google Meet for free is not only possible but also quite simple once you get the hang of it. Whether you’re looking to keep a record for yourself or share it with colleagues, having a reliable method in place is key. Just remember to respect privacy and inform participants before hitting that record button! By following the tips outlined in this guide, you’ll be well-equipped to handle any meeting like a pro. So go ahead, start recording, and elevate your virtual meeting game today!
Frequently Asked Questions About Recording Google Meet
Q: Can I record Google Meet for free?
Yes, you can use free tools like OBS Studio or browser extensions such as Screenity to record Google Meet sessions without additional costs.
Q: Is it legal to record Google Meet sessions?
It depends on local laws and organizational policies. Always inform participants beforehand and obtain explicit consent to avoid legal complications.
Q: What is the best tool for recording Google Meet?
OBS Studio is highly recommended due to its flexibility and advanced features, though simpler alternatives like Loom may suffice for basic needs.
Q: How do I edit my recorded Google Meet videos?
Use video editing software like iMovie (for macOS) or DaVinci Resolve (cross-platform) to trim, add effects, and enhance your recordings.
Q: Can I record only audio from Google Meet?
Yes, many tools allow selective recording of audio streams. Check the settings in your chosen application to enable this feature.
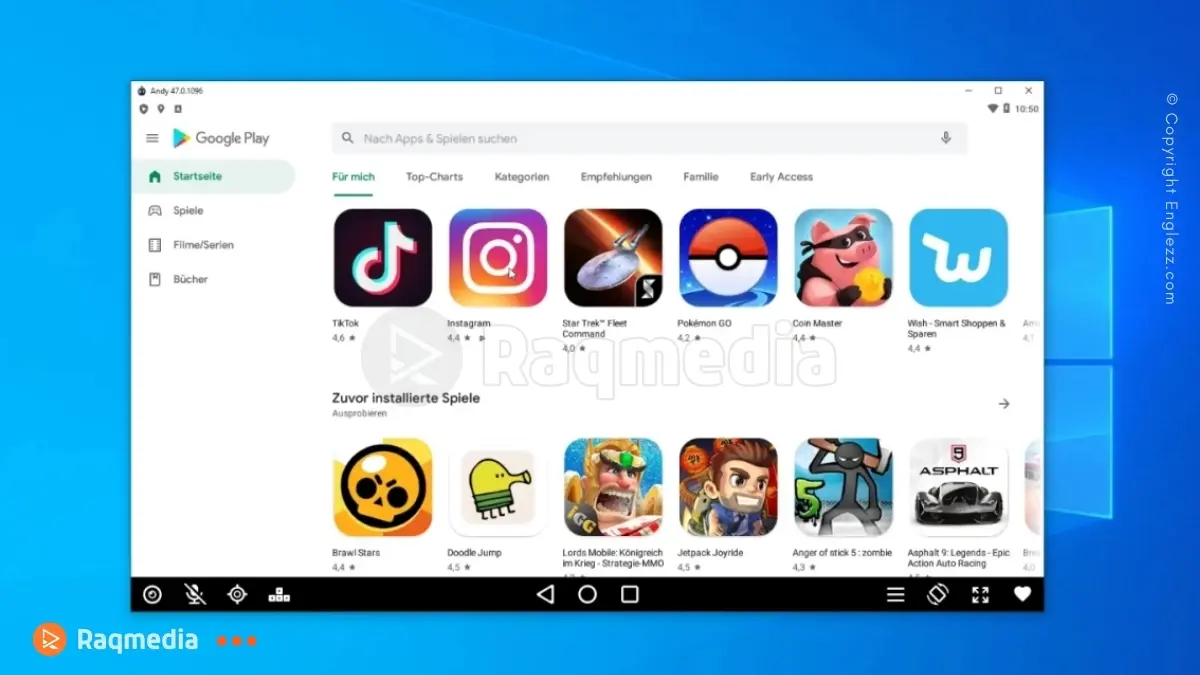
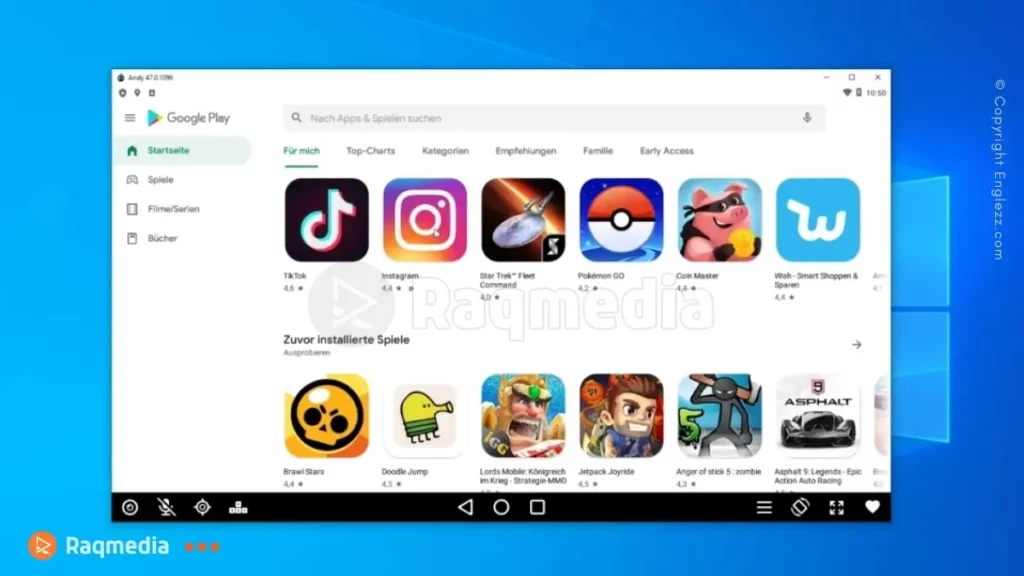
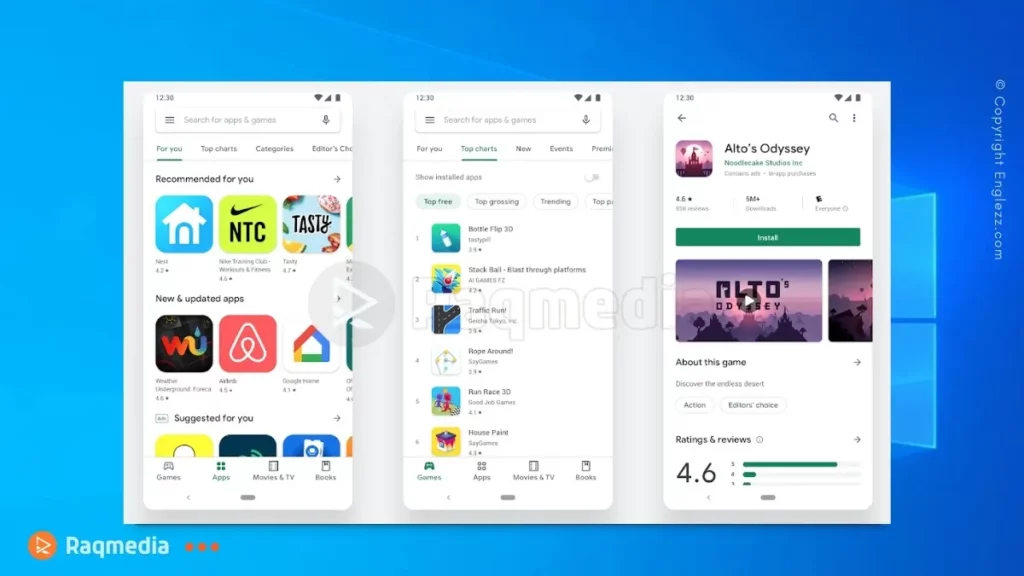
With the recent release of Windows 11, users are eager to explore its new features and functionalities. One of the most in-demand features is the ability to download and use Android apps on Windows 11. While Microsoft has officially announced that they will be bringing Android apps to Windows 11, it is still in the works and not yet available to the public. But don’t worry, we have got you covered with a simple and easy method to install Google Play Store on your Windows 11 PC.
How to Install Google Play Store on Windows 11
Before we delve into the steps, make sure that you are using Windows 11 Pro or higher edition. This is because the method requires enabling virtualization technology, which is only available on Pro or higher editions. If you are using Windows 11 Home edition, you can upgrade to Pro edition for an affordable price from One by One Soft Limited, a Microsoft partner that provides licensed software at a discounted price.
To install Google Play Store on Windows 11, you can follow these steps:
Follow the installation instructions provided with MagiskOnWSA to install WSA and Google Play Store.
Method 2: Using PowerShell Windows Toolbox
Prerequisites: Ensure your Windows 11 system is updated, and you have PowerShell installed. Open the Microsoft Store and update all apps on the “Library” page. Reboot your PC to ensure all updates are applied. Open PowerShell and run the following command:
To begin with, go to your system settings and check the version of Windows 11 you are running. Look for “Which version of Windows are you running?” and make sure it says Windows 11 Pro. If not, consider upgrading to Pro edition from One by One Soft Limited.
Step 2: Enable Virtualization and Hyper-V
Next, you need to enable virtualization technology and Hyper-V on your PC. These features are required for the installation process to work smoothly. To do this, go to “Turn Windows features on or off” and make sure “Virtual Machine Platform” and “Hyper-V” are checked.
Step 3: Uninstall previous versions of Windows Subsystem for Android
After running the extracted file, a PowerShell window will open, and WSA will start installing automatically. Once completed, you will see Google Play Store on your PC. Log in with your email address and password, and you’re good to go!
That’s all there is to it! With these simple steps, you can easily install Google Play Store on your Windows 11 PC and access a world of Android apps. However, keep in mind that this is not an official method, so some apps may not work properly. In case you encounter any issues, feel free to reach out to us through the comment section below.
So, why wait? Upgrade to Windows 11 Pro, follow these steps, and enjoy the best of both worlds – Android apps on your Windows 11 PC!
FAQs:
Q. Can Google Play Store be installed on Windows 11?
A. Yes, it is possible to install Google Play Store on Windows 11 with the help of an Android emulator.
Q. Is it legal to install Google Play Store on Windows 11?
A. It is legal to install the Google Play Store on Windows 11 as long as you use legitimate methods and do not violate any terms of service.
Q. Which Android emulator is recommended for installing Google Play Store on Windows 11?
A. Popular options include Bluestacks, Nox Player, and MemuPlay.
Q. Do I need a Google account to access the Google Play Store on Windows 11?
A. Yes, you will need a Google account to sign in and download apps from the Play Store.
Q. Can all Android apps be downloaded from the Google Play Store on Windows 11?
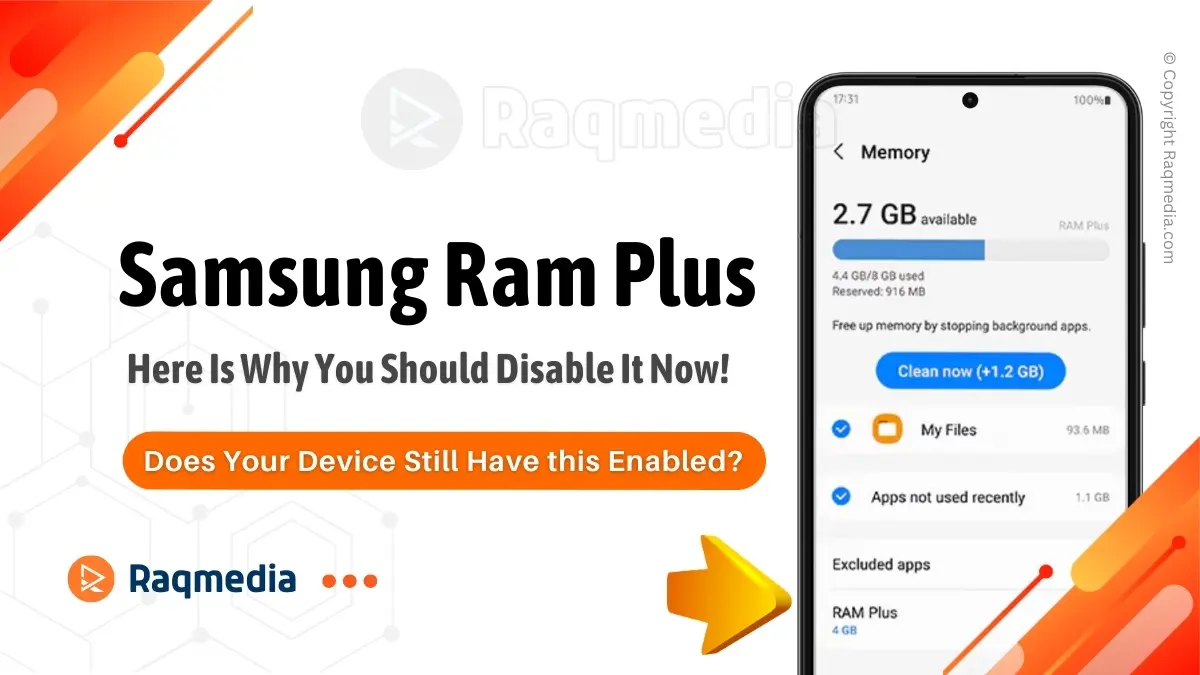
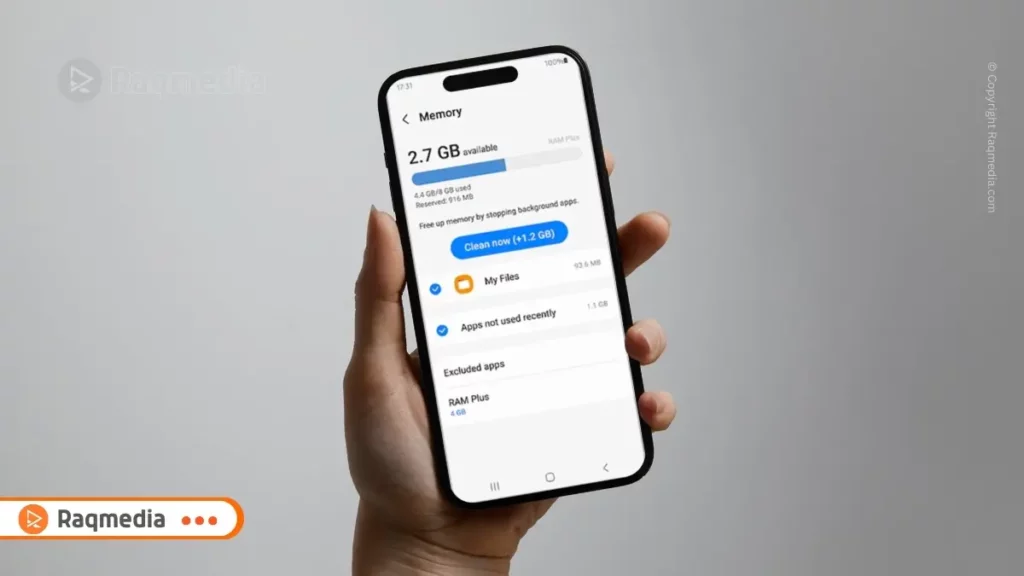
Is your Samsung device performing at its best? There’s a crucial setting that Samsung left enabled by default, but you should disable it for better performance. The spotlight is on RAM Plus deactivation – an important feature that users can optimize to enhance their device’s capabilities. Ignoring this setting could lead to potential issues affecting your device’s efficiency and stability.
Your Samsung device running smoother, with improved battery life and enhanced multitasking abilities. That’s the promise of disabling the RAM Plus setting. It’s time to take charge and make the necessary adjustments to ensure your Samsung device is operating at peak performance. Don’t wait until you notice problems – act now to reap the benefits of deactivating this feature and unlock a whole new level of functionality for your Android device. Let’s dive into how you can make this simple yet impactful change for more seamless user experience!
Does Your Samsung Device Still Have this Enabled?
Are you a Samsung phone user? If so, you might want to take a closer look at your phone settings. There is a feature called “RAM Plus” that is enabled by default on many Samsung phones, and it might actually be doing more harm than good. In this article, we will break down what RAM Plus is, who might benefit from it, and why you should consider disabling it on your phone.
What is the Samsung RAM Plus?
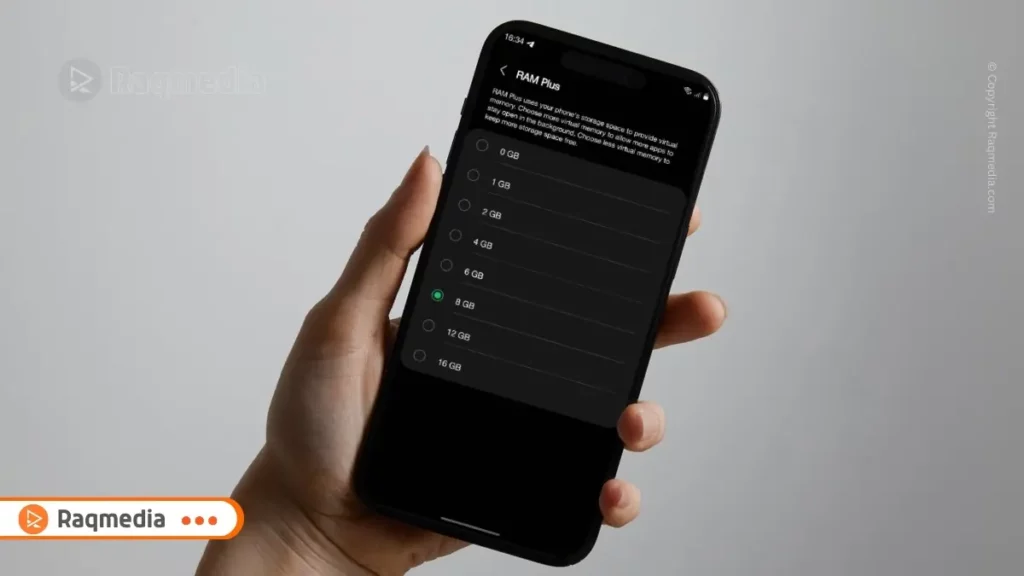
The RAM Plus feature is a setting that aims to enhance multitasking capabilities by allocating virtual RAM to supplement the device’s physical memory. This function essentially allows your smartphone to create an illusion of having more RAM than it physically possesses, theoretically improving overall performance during demanding tasks. However, despite this seemingly beneficial feature, leaving the RAM Plus setting enabled can actually have adverse effects on your device’s performance. Read more on Samsung official support blog here:
By opting to keep the RAM Plus setting active on your Samsung device, you may unknowingly contribute to increased battery consumption and potential system instability. While the idea of having additional virtual RAM might sound appealing, the reality is that it can strain your device’s resources unnecessarily, impacting its efficiency in managing tasks and creating lags or freezes during operation. To avoid these pitfalls and optimize your device’s performance, it is crucial to locate and disable the RAM Plus setting promptly.
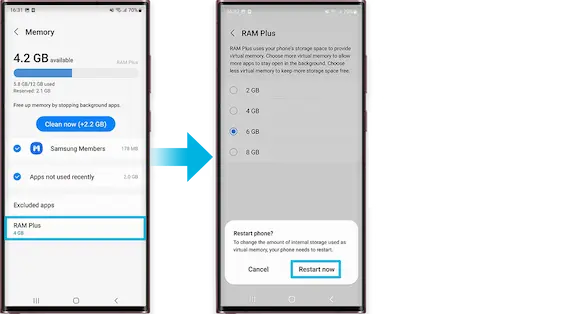
How Do I Turn On RAM Plus On My Samsung?
To navigate through your Samsung device’s settings and deactivate the RAM Plus feature, begin by accessing the Settings menu followed by the “Device care” or “Battery and Device Care” section. From there, look for options related to memory or performance enhancements where you are likely to find the RAM Plus setting toggle switch. By switching this feature off, you can prevent unnecessary strain on your device’s resources and potentially notice a significant improvement in its responsiveness and overall speed.
Ensuring that Samsung users understand how enabling or disabling certain features can impact their device’s functionality is vital in maintaining optimal performance levels. By taking charge of settings like RAM Plus deactivation, users can proactively enhance their smartphone experience without compromising on essential aspects like battery life or stability. Don’t delay—check your Samsung device now and make sure you disable this less-than-beneficial feature for smoother operation and improved efficiency.
Does RAM Plus Improve Performance?
Disabling the RAM Plus setting on your Samsung device can have a significant impact on its overall performance. By leaving this feature enabled, you may experience increased battery drain as your device allocates additional resources to manage unnecessary tasks. This drainage can be particularly noticeable during extended use or when running multiple applications simultaneously.
Imagine trying to open several apps at once only to find that your device slows down or struggles to keep up with your commands. This is a common scenario for users who haven’t disabled the RAM Plus setting. With this feature deactivated, you’ll notice an immediate improvement in system stability and responsiveness, allowing for smoother multitasking without compromising on speed.
Impact Of Ram Plus on Device Performance
In real-world terms, not disabling the RAM Plus setting can hinder your device’s ability to operate efficiently, potentially leading to frustrating lags or delays in executing commands. By turning off this configuration, you’re essentially streamlining your device’s performance, ensuring that it functions optimally under various usage conditions. Users who switch off the RAM Plus setting often report a more seamless experience when navigating through apps or handling demanding tasks on their Samsung devices.
Overall, by taking control of this crucial setting and deactivating the RAM Plus feature on your Samsung device, you are proactively enhancing its performance capabilities. Whether you’re a heavy multitasker or simply looking for a smoother user experience, disabling this option can make a noticeable difference in how your device functions daily.
How to Disable RAM Plus Setting? RAM Plus Deactivation
To improve your Samsung device’s performance, follow these simple steps for RAM Plus deactivation setting.
First, navigate to your phone’s “Settings” menu.
Then, look for the “Device Care” option; this is where you’ll find the settings related to optimizing your device’s performance.
Once in “Device Care,” tap on “Memory” or a similar section that manages your device’s memory usage.
Next, locate the “RAM Plus” feature within the memory settings.
This is the setting that you need to turn off to enhance your device’s efficiency.
Simply toggle the switch or button next to RAM Plus to deactivate this function.
💡RAM Plus Deactivation Tip 1:
Don’t worry; disabling RAM Plus won’t hinder your device’s overall performance – it can actually help by preventing unnecessary strain on your system.
If you’re concerned about RAM Plus deactivation which might affect multitasking capabilities or app performance, there are alternative adjustments you can make. Explore adjusting individual app settings or consider clearing background apps more frequently for a similar effect. Remember, disabling RAM Plus is about balancing resources effectively for smoother operation.
For those worried about potential issues after deactivating this setting, rest assured that many Samsung users have reported positive results post-disabling RAM Plus. By sharing insights and recommendations on online forums and communities, users have found ways to optimize their devices without compromising performance. Join the conversation and discover the benefits of fine-tuning your Samsung device for peak efficiency!
Benefits of Disabling RAM Plus on Samsung
By disabling the RAM Plus option on your Samsung device, you can unlock a host of benefits that directly impact your user experience. One significant advantage is the improvement in multitasking capabilities. With this setting turned off, your device allocates memory more efficiently, allowing you to seamlessly switch between apps without experiencing lags or delays. Imagine browsing the web while streaming music and checking your emails with no performance hiccups – that’s the power of disabling RAM Plus.
To better understand the impact, consider a scenario where a Samsung user disables RAM Plus on their device. Prior to deactivation, they might have noticed occasional sluggishness when using resource-intensive applications simultaneously. After turning off this setting, the same user experiences a noticeable increase in responsiveness and fluidity when multitasking. It’s like unleashing the full potential of your Samsung device that was previously hindered by unnecessary memory allocation restrictions.
I urge you to take action and disable RAM Plus on your Samsung device today to witness these transformative changes firsthand. After making this simple adjustment, spend some time using your device as you normally would and pay attention to how much smoother and faster your daily interactions become. Don’t just take our word for it – try it out for yourself and share your success stories with other Samsung users who are looking to optimize their devices for peak performance.
💡RAM Plus Deactivation Tip 2:
Remember, small tweaks like disabling RAM Plus can make a world of difference in how you experience and interact with your Samsung device daily. Stay ahead of potential performance issues by taking control of these settings proactively – your device will thank you with enhanced efficiency and responsiveness that elevate your overall digital experience.
Community Feedback and Experiences
Since the RAM Plus deactivation on Samsung devices, users have reported significant improvements in their device performance. One user shared how their phone’s battery life increased noticeably after deactivating this setting, allowing them to use their device for longer periods without needing a recharge. Another user mentioned experiencing smoother multitasking capabilities and quicker app responses, highlighting the overall enhancement in the phone’s speed and responsiveness.
As we create a platform for readers to share their stories and tips, many have chimed in with additional settings adjustments that have further optimized their Samsung devices. For example, adjusting animations or background processes alongside disabling RAM Plus has been a winning combination for some users looking to maximize their phone’s efficiency without sacrificing functionality. These shared experiences not only validate the importance of disabling specific features but also foster a community of informed users who can collectively improve their smartphone experience.
Moreover, discussions around other hidden features impacting device performance have sparked insightful conversations among tech enthusiasts. Users have raised awareness about potentially detrimental settings that could be unknowingly affecting their Android devices negatively. By exchanging knowledge and experiences, readers can proactively identify and address such configurations to ensure optimal performance from their Samsung devices. This collaborative approach not only empowers users but also encourages ongoing exploration into maximizing the capabilities of modern smartphones.
Final Recommendations
In short, disabling the RAM Plus setting on your Samsung device is crucial for optimal performance and efficiency. By deactivating this feature, users can prevent unnecessary strain on the system, leading to improved multitasking capabilities and smoother operation. It is essential to take proactive steps in managing device settings to ensure a seamless user experience.
Regular system optimizations are key to maintaining your Samsung device’s health and ensuring it functions at its best capacity. Stay vigilant about updates, app management, and configuration adjustments to avoid potential drawbacks such as decreased battery life or system instability. Paying attention to these details can make a significant difference in how your device performs on a day-to-day basis.
As part of your Android device ownership, remember that hidden settings like RAM Plus could impact your overall experience without you even realizing it. By staying informed and actively managing your device’s configurations, you are taking the necessary steps towards maximizing its potential. Embrace the opportunity to fine-tune your Samsung device for peak performance by disabling settings that may hinder rather than help its functionality. Your diligence will be rewarded with a more responsive and efficient device tailored to your needs.
Is RAM Plus useful on Samsung?
While RAM Plus may seem like a useful feature, it is not necessary for newer Samsung phones and can actually hinder performance. If you have a mid-range or older phone with less than 6GB of RAM, it might be beneficial for you, but for everyone else, it is recommended to disable this feature.
Instead, try using the “background process limit” setting to improve your phone’s performance without putting extra strain on its storage. With these tips, you can ensure that your Samsung phone is running at its best and avoid any potential issues caused by virtual RAM.
Conclusion: Take Control of Your Samsung Device’s Performance Today!
As we wrap up our exploration of the crucial RAM Plus setting on Samsung devices, it is essential to emphasize the urgency of disabling this feature for optimal performance. By deactivating RAM Plus, you are empowering your device to operate at its full potential, enhancing battery life, system stability, and overall user experience. Don’t wait any longer – take action now to ensure your Samsung device is running smoothly and efficiently.
Remember, staying informed about hidden settings like RAM Plus and regularly optimizing your device can make a significant difference in how your smartphone functions. For more tech tips and insights into maximizing your Samsung experience, stay tuned to future updates. Join the community discussion and share your experiences after disabling RAM Plus – let’s work together to unlock the full capabilities of our beloved Samsung devices!
FAQs On RAM Plus Deactivation:
Q. What is the RAM Plus setting on Samsung devices?
A: The RAM Plus setting allows users to temporarily increase their device’s available memory by utilizing storage space.
Q. Why should I disable the RAM Plus feature?
A: Disabling RAM Plus can lead to improved device performance by preventing potential issues like increased battery drain or decreased system stability.
Q. How do I locate and turn off the RAM Plus setting on my Samsung device?
A: To disable it, go to Settings > Battery & Device Care > Memory > Turn off “RAM Plus.”
Q. Will turning off RAM Plus impact my multitasking capabilities negatively?
A: Disabling this feature will not necessarily hinder multitasking abilities but may actually enhance overall device performance.
Q. Are there alternative settings I can adjust once I disable RAM Plus?
A: You can optimize other system settings or utilize built-in features like Developer Options for further customization.
Q. What benefits can I expect after turning off the RAM Plus option?
A: Improved battery life, smoother operation, and enhanced system responsiveness are common benefits reported by users post-deactivation.
Q. Is it safe to disable the RAM Plus setting on my Samsung device?
A: Yes, it is safe to turn off this feature as doing so often leads to a better user experience with fewer performance-related issues.
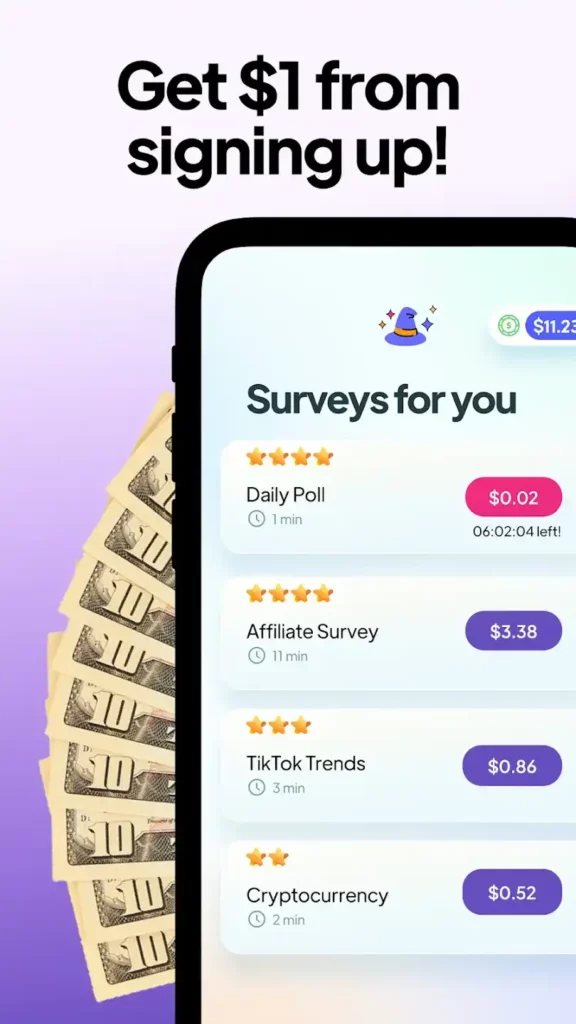
In today’s interconnected and digital era, there seems to be an endless array of ways to make money online. From freelance gigs to affiliate marketing, the options are seemingly boundless. However, one often overlooked method that has gained significant popularity in recent years is participating in online surveys. These surveys not only provide valuable feedback for companies and market research firms but also offer individuals a chance to earn some extra cash from the comfort of their own homes. And when it comes to user-friendly survey platforms with enticing rewards, SurveyMagic emerges as a true game-changer.
Effortless Way of Earning Money
Gone are the days of filling out tedious questionnaires on pen and paper or being bombarded with irrelevant queries. With the advent of SurveyMagic, mobile users now have access to an effortless way of earning money by simply sharing their opinions. This sleek and intuitive app offers a range of well-designed surveys that cater to different interests and demographics while ensuring that participants are duly compensated for their time.
But let’s delve deeper into what makes SurveyMagic stand out among its competitors— how this innovative platform seamlessly integrates convenience, usability, and attractive monetary incentives into one easy-to-use application. Whether you’re looking for a side hustle or merely want a legitimate way to spend your downtime wisely while earning cash rewards along the way, keep reading as we uncover why SurveyMagic may just be the perfect fit for you.
One of the standout features of the SurveyMagic app is its user-friendly interface, making it incredibly easy to navigate. From the moment you download the app, you are greeted with a clean and intuitive design that allows for effortless browsing and survey completion. The layout is well-organized, with clearly labeled sections for surveys, rewards, and account settings.
Whether you’re a tech-savvy individual or someone who prefers simplicity when using mobile applications, you’ll appreciate how straightforward it is to use SurveyMagic. With just a few taps on your screen, you can easily access surveys in different categories or check your account balance without any hassle. This user-centric approach ensures that even those new to survey apps will have no trouble finding their way around.
Variety of survey options available
SurveyMagic truly understands that not all users have the same interests or preferences when it comes to taking surveys. That’s why one of the most impressive aspects of this app is its wide range of survey options available. Regardless if you’re a fashion enthusiast wanting to share your style opinions or a foodie eager to provide feedback on new restaurant menus – there’s something for everyone.
Unlike other platforms where you might find yourself stuck answering questions about topics that bore or don’t resonate with you personally, SurveyMagic offers an extensive selection ensuring there’s always something fresh and exciting waiting for every user. So whether you’re interested in politics, health and wellness trends, entertainment news or travel experiences – be prepared to discover captivating topics tailored specifically to suit your areas of interest.
Personalized preferences based on interests provided during sign-up
When signing up for SurveyMagic; one thing becomes evident – they genuinely value what matters most: YOU! During registration process; users are given an opportunity to specify their personal interests which ultimately leads them towards more relevant surveys matched precisely with their selected fields as per their choice!
Imagine spending your precious time answering questions that genuinely align with your passions, hobbies or even professional expertise! SurveyMagic understands the value of combining individuals’ personal interests with their survey participation. This personalized approach not only makes the process more enjoyable but also enhances user experience and maximizes potential earnings. So never worry about receiving irrelevant surveys – SurveyMagic has got you covered every step of the way!
SurveyMagic App Review: Easy Surveys for Cash
Earnings Potential
When it comes to earning money through SurveyMagic, the potential is as vast as your commitment. While some may view survey-taking as a mere side gig, there are success stories that prove otherwise. Many satisfied users have reported making substantial amounts of cash with minimal effort invested.
Take Lisa Johnson, for example. A busy working mom who stumbled upon SurveyMagic during her search for flexible income opportunities online. With just a few spare hours each evening, she managed to earn an impressive $500 in her first month alone! The best part? She could easily fit these surveys into her already packed schedule without feeling overwhelmed or financially strained.
What sets SurveyMagic apart from other survey apps is its ability to match you with surveys tailored to your interests and demographic profile. This targeted approach ensures that you’re not wasting time on irrelevant questions, but rather providing valuable insights and feedback to brands and companies who truly value your opinion. So whether you’re saving up for that dream vacation or simply looking to supplement your income, the earning potential with SurveyMagic is unquestionable – all while having fun answering interesting questionnaires on topics you genuinely care about.
Setting up an account and accessing available surveys within the SurveyMagic app is a breeze. The user-friendly interface makes it easy for newcomers to quickly navigate through the app. To get started, simply download the app from your respective mobile device’s app store, create an account using your email address or social media accounts, and complete your profile.
Once you’re logged in, you’ll be greeted with a clean dashboard that displays all the available surveys you can participate in. The survey listings are categorized based on their estimated completion time and reward amount, allowing users to choose which surveys best fit their preferences and availability.
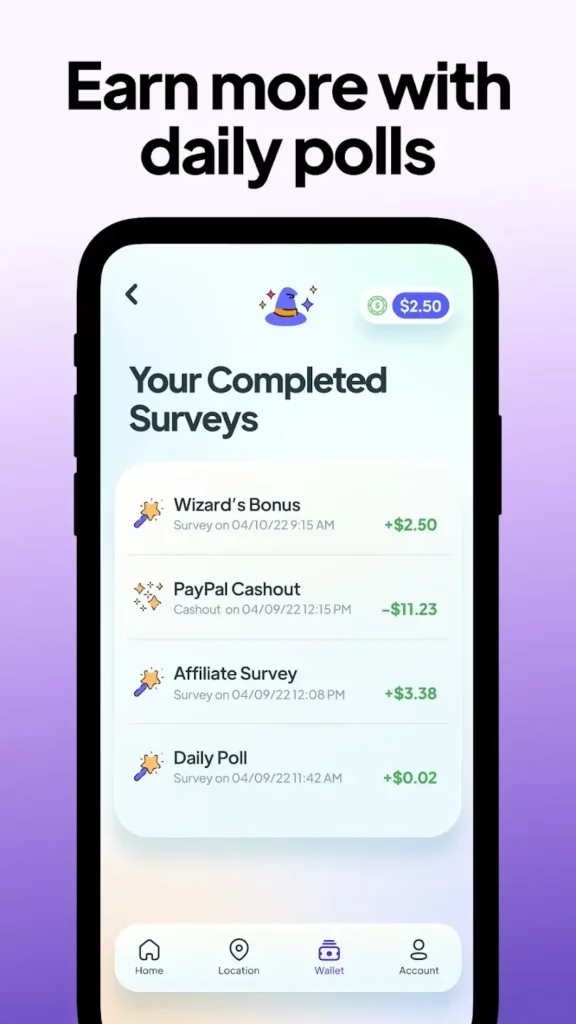
Redeeming earnings earned from completing surveys is also hassle-free with SurveyMagic. Users have multiple options when it comes to cashing out their rewards – whether choosing PayPal transfers, electronic gift cards for popular online retailers like Amazon or Target, or even physical gift cards mailed straight to your doorstep.
SurveyMagic understands that everyone has different preferences when it comes to receiving their hard-earned cash rewards, so they provide flexible payout methods that cater to each user’s unique needs. This level of convenience ensures that users can enjoy the fruits of their survey-taking efforts in a way most convenient for them.
Overall, the usability of the SurveyMagic app shines through its user-friendly interface and intuitive navigation system. It streamlines both survey participation and reward redemption processes efficiently while offering various payment options tailored to individual preferences—making it easy for anyone looking to earn some extra income on-the-go without any unnecessary hassle.
When it comes to the SurveyMagic app, there are plenty of advantages that make it a popular choice for those looking to earn extra cash. One of the most appealing aspects is the flexibility it offers in terms of working hours. Unlike traditional job opportunities, where you have set schedules and deadlines, with SurveyMagic, you can complete surveys at any time that suits you best. Whether you’re an early bird or a night owl, this app allows you to work around your own schedule.
Another major pro is that there are no qualification requirements needed to start earning on SurveyMagic. Anyone can sign up and start taking surveys immediately – no previous experience or degrees required. This means that almost anyone who has a smartphone or tablet can participate and reap rewards from their opinions.
Cons of SurveyMagic App
like any platform, SurveyMagic does come with some limitations too. While there are numerous surveys available on the app each day, not all of them will be high-paying opportunities. It’s important to keep in mind that earnings may vary depending on the length and complexity of each survey. Additionally, occasional technical issues with the app’s performance have been reported by users in certain instances. However, these issues are usually resolved quickly by the developers’ responsive support team.
Overall, despite its limitations, SurveyMagic provides individuals with a convenient way to earn money through completing online surveys from their mobile devices.
Tips for Maximizing Earnings
One of the key aspects of maximizing earnings with the SurveyMagic app is to adopt effective survey-taking practices.
Firstly, it’s important to select surveys that offer higher payouts and prioritize those that match your interests or demographics. This way, you can ensure that your time is well-spent on surveys that have a higher chance of earning you more cash rewards.
Another strategy for maximizing earnings is efficient time management. Set aside specific periods in your day dedicated solely to completing surveys. By creating a clear schedule and sticking to it, you can ensure that you make the most out of your available time.
Additionally, don’t overlook referral programs as they present an excellent opportunity to increase your income on the SurveyMagic app. Spread the word about the app among friends and family using unique referral codes provided by SurveyMagic. When someone signs up through your code and starts completing surveys, both parties receive bonus rewards – a win-win situation!
By implementing these tips into your SurveyMagic journey, you’ll be well on your way to maximizing your earnings and reaping greater benefits from this convenient survey platform. Remember: choose wisely when selecting surveys, manage your time effectively, and take advantage of referral programs. Happy earning!
Conclusion:
The SurveyMagic app is a reliable and convenient platform for individuals looking to earn money through surveys. Throughout this review, we have discussed its features, usability, and potential earnings. With its user-friendly interface and wide range of survey opportunities, SurveyMagic proves to be an excellent choice for those seeking easy ways to make cash from their mobile devices.
One key takeaway from this article is that using the SurveyMagic app can be a lucrative side hustle option. By dedicating just a few minutes each day to completing surveys, users can accumulate cash rewards that can add up over time. Whether it’s filling out surveys during your commute or during downtime at home – SurveyMagic provides flexible opportunities for earning money on your own terms.
Don’t miss out on the chance to turn your opinions into cash! Download the SurveyMagic app today and start making money by sharing your thoughts through surveys. Remember, every survey completed brings you one step closer to monetary rewards. So why wait? Join thousands of satisfied users who are already reaping the benefits of this fantastic app. Start earning with SurveyMagic now!
WhatsApp is one of the most popular instant messaging apps in the world. It offers a wide range of features that can help you stay connected with your friends, family, and colleagues. While many people are familiar with the basic features of the App, there are some hidden features that you may not know about. In this article, we’ll take a look at 11 of these WhatsApp features and how you can use them to enhance your WhatsApp experience.
#1. WhatsApp Web and Desktop App
WhatsApp Web is a web-based version of WhatsApp features that you can use on your computer. This feature allows you to use WhatsApp on your computer just like you would on your phone. You can send and receive messages, make voice and video calls, and much more. Here’s how you can use WhatsApp Web:
Open your web browser and go to web.whatsapp.com. Open WhatsApp on your phone and tap on the menu icon (three dots in the top-right corner). Tap on “WhatsApp Web”. Point your phone’s camera at the QR code displayed on the website.
Benefits of using WhatsApp Web
Convenience: With WhatsApp Web, you can use WhatsApp on your computer without having to constantly switch between your phone and computer. Improved typing speed: Typing on a physical keyboard is faster than typing on a phone, so you can send messages more quickly. Larger screen: A larger screen makes it easier to see your messages and read conversations.
#2. WhatsApp End-to-End Encryption
End-to-end encryption is a security option of WhatsApp Features that helps to protect the privacy of your conversations on WhatsApp. When end-to-end encryption is enabled, your messages are encrypted so that only you and the recipient can read them. Here’s how end-to-end encryption works on WhatsApp:
When you send a message, it is encrypted before it leaves your device. The encrypted message is sent over the internet to the recipient’s device. The recipient’s device decrypts the message and displays it to the user.
Importance of end-to-end encryption in WhatsApp
Privacy: End-to-end encryption helps to keep your conversations private and secure, even if they are intercepted by a third party. Trust: End-to-end encryption helps to build trust between users by ensuring that their conversations are secure and private. Compliance: For businesses, end-to-end encryption helps to comply with privacy regulations and data protection laws.
WhatsApp group video calls, one of the popular WhatsApp Features, allow you to have video conversations with multiple people at the same time. Here’s how you can make a group video call on WhatsApp:
Open a group chat in WhatsApp.
Tap on the video call icon in the top-right corner of the screen.
Select the participants you want to include in the video call.
Benefits of using group video calls on WhatsApp
Convenience: Group video calls allow you to have conversations with multiple people at the same time, which can be more convenient than having separate calls with each person. Improved communication: Video calls provide a more personal and interactive way to communicate, which can help to improve relationships and build trust. Increased productivity: For businesses, group video calls can increase productivity by allowing teams to collaborate and communicate more effectively.
#4. WhatsApp Stickers
WhatsApp stickers are a fun way to add some personality to your conversations. There are many different stickers available, including stickers featuring popular characters, animals, and more. Here’s how you can use stickers from WhatsApp Features:
Tap on the smiley face icon in the bottom left corner of the screen.
Tap on the stickers icon (a square with a folded corner) to access the stickers library.
Select the sticker you want to send.
Benefits of using stickers in WhatsApp
Adds personality: Stickers are a fun way to add some personality to your conversations and express yourself. Saves time: Instead of typing out a message, you can quickly send a sticker to express your thoughts or emotions. Adds variety: With a wide range of stickers available, you can choose from a variety of themes and styles to suit your mood and personality.
#5. WhatsApp Status
WhatsApp Status is a feature that allows you to share photos, videos, and GIFs with your contacts for a period of 24 hours. Here’s how you can use WhatsApp Status – one of WhatsApp Features:
Open WhatsApp and tap on the status tab (a circle with a smiley face).
Tap on the camera icon in the bottom center of the screen.
Take a photo or select a photo from your camera roll.
Tap on the send button to share your status.
Benefits of using WhatsApp Status
Easy sharing: WhatsApp Status makes it easy to share photos and videos with your contacts in a quick and convenient way. Increased engagement: With the ability to view and interact with others’ statuses, WhatsApp Status can increase engagement between friends, family, and colleagues. Increased visibility: By sharing photos and videos on WhatsApp Status, you can increase your visibility and let others know what you’re up to.
#6. WhatsApp Backups
Backups are WhatsApp Features that allows you to backup your WhatsApp chats and media to Google Drive or iCloud. Here’s how you can backup your WhatsApp data:
Open WhatsApp and tap on the menu icon (three dots in the top-right corner).
Tap on “Settings”.
Tap on “Chats”.
Tap on “Chat Backup”.
Tap on “Back Up Now” to start the backup process.
Benefits of using WhatsApp Backups
Data protection: By backing up your WhatsApp data, you can protect your important conversations and media in case of data loss or device failure. Easy transfer: With WhatsApp Backups, you can easily transfer your WhatsApp data to a new phone if you switch devices. Peace of mind: Knowing that your WhatsApp data is backed up can give you peace of mind and ensure that your conversations and media are safe.
WhatsApp Fingerprint Lock is another security WhatsApp Features that allows you to secure your WhatsApp with your fingerprint. Here’s how you can enable WhatsApp Fingerprint Lock:
Open WhatsApp and tap on the menu icon (three dots in the top-right corner).
Tap on “Settings”.
Tap on “Account”.
Tap on “Privacy”.
Tap on “Fingerprint lock”.
Follow the on-screen instructions to enable fingerprint lock.
Benefits of using WhatsApp Fingerprint Lock
Increased security: By securing your WhatsApp with your fingerprint, you can ensure that only you can access your chats and media. Quick access: With WhatsApp Fingerprint Lock, you can quickly and easily unlock your WhatsApp with just a touch, without having to enter a password. Customizable: You can customize the settings for WhatsApp Fingerprint Lock, such as the lock time, to suit your preferences and needs.
#8. WhatsApp Web
WhatsApp Web is a feature that allows you to use WhatsApp on your computer or laptop. Here’s how you can use WhatsApp Web:
Open your computer or laptop browser and go to web.whatsapp.com. Open WhatsApp on your phone and tap on the menu icon (three dots in the top-right corner). Tap on “WhatsApp Web/Desktop”. Point your phone’s camera at the QR code on the computer screen. Once the QR code is scanned, your WhatsApp chats will appear on your computer or laptop.
Benefits of using WhatsApp Web
Increased convenience: With WhatsApp Web, you can use WhatsApp on your computer or laptop, making it easier to send and receive messages, photos, and videos. Increased efficiency: With a larger screen and keyboard, you can type and respond to messages more efficiently when using WhatsApp Web. Multi-device support: With WhatsApp Web, you can use WhatsApp on multiple devices at the same time, including your phone, computer, and tablet.
WhatsApp Group Calls is one of the WhatsApp Features that allows you to make voice or video calls with multiple people at the same time. Here’s how you can make a group call on WhatsApp:
Open a group chat in WhatsApp. Tap on the call icon in the top-right corner of the screen. Select the contacts you want to call. Tap on the voice or video call icon to start the call.
Benefits of using WhatsApp Group Calls
Increased connectivity: With WhatsApp Group Calls, you can connect with multiple people at the same time, making it easier to stay in touch with friends, family, and colleagues. Increased efficiency: With group calls, you can hold meetings, catch up with friends, and more, all in one call, saving time and increasing efficiency. Increased engagement: With the ability to make voice or video calls, you can increase engagement and build stronger relationships with those you call.
#10. WhatsApp End-to-End Encryption
WhatsApp End-to-End Encryption is a security feature that protects your conversations and media with encryption. Here’s how it works:
When you send a message or media on WhatsApp, it is encrypted on your device. The encrypted message or media is then sent to the recipient’s device. The message or media is then decrypted on the recipient’s device.
Increased security: With end-to-end encryption, your conversations and media are protected from unauthorized access or interception, ensuring your privacy and security. Increased peace of mind: Knowing that your conversations and media are protected by encryption can give you peace of mind and ensure that your information is secure. Increased trust: With end-to-end encryption, you can trust that your conversations and media are protected, increasing trust and confidence in your chats and media.
#11. WhatsApp Business
WhatsApp Business is a version of WhatsApp specifically designed for small businesses to connect with their customers. Here’s how you can use WhatsApp Business:
Download the WhatsApp Business app from the App Store or Google Play Store. Set up your business profile with your business name, description, and profile picture. Connect with your customers by responding to messages, sending automated messages, and more.
Benefits of using WhatsApp Business
Increased visibility: With a business profile on WhatsApp, your customers can easily find and connect with your business. Increased efficiency: With the ability to respond to messages quickly and easily, you can increase efficiency and improve customer satisfaction. Increased engagement: By connecting with customers on WhatsApp, you can increase engagement and build stronger relationships with your customers.
WhatsApp is a versatile and user-friendly app that offers a wide range of features to enhance your communication experience. From privacy settings to backup options, there’s something for everyone. Whether you’re looking to add some personality to your chats with stickers or status updates, or you want to take advantage of the business features to connect with customers, WhatsApp has got you covered.
The features discussed in this article are just the tip of the iceberg, and there’s much more to discover and explore. So, dive in and start taking advantage of all that WhatsApp has to offer!
WhatsApp is a widely used instant messaging app that allows users to send text messages, make voice and video calls, and share photos and files with friends and family. To get the most out of this versatile app, it’s important to know some WhatsApp tips and tricks that can help you better manage your chats, enhance your privacy and security, and improve your productivity.
WhatsApp Tips and Tricks
In this article, we’ll discuss some of the best tips and tricks that you can use to make the most of your WhatsApp experience.
Organizing Chats
One of the keys to an efficient and organized WhatsApp experience is managing your chats effectively. Here are a few tips that can help you do just that:
Creating and Managing Groups
WhatsApp groups allow you to communicate with multiple people at once, making it a great way to keep in touch with friends and family, collaborate on projects, and more. To create a new group, simply tap the “New Group” button in the chats screen and select the people you want to include in the group. Once you have a group set up, you can manage it by adding or removing members, changing the group name and picture, and more.
Archiving Chats
Archiving chats is a great way to declutter your chats screen and keep your most important conversations within easy reach. To archive a chat, simply swipe left on the chat in the chats screen and tap the “Archive” button. Archived chats can be accessed later by tapping the “Archived Chats” button in the chats screen.
Pinning Chats to the Top
Pinning chats to the top is a quick and easy way to ensure that your most important conversations are always at the top of the chats screen. To pin a chat, simply swipe right on the chat in the chats screen and tap the “Pin” button. Pinned chats will always be displayed at the top of the chats screen, even if you receive new messages from other chats.
Customizing the App
Customizing WhatsApp can help you personalize the app and make it more visually appealing. Here are a few customization options that you can try:
WhatsApp allows you to change the theme of the app, giving you the ability to choose between a variety of color combinations and background images. To change the theme, simply tap the “Settings” button in the chats screen, then tap “Chats” and “Theme.” From there, you can choose from a selection of pre-installed themes or create your own custom theme by selecting a background image and accent color.
Setting Custom Notifications for Individual Chats
The app allows you to set custom notifications for individual chats, making it easy to differentiate between important and less important conversations. To set custom notifications, simply tap and hold on the chat in the chats screen, then tap “Custom Notifications.” From there, you can choose a custom tone, vibration pattern, and light color for the chat.
Enabling Dark Mode
Dark mode is a popular feature that can help reduce eye strain and make it easier to use WhatsApp in low-light conditions. To enable dark mode, simply tap the “Settings” button in the chats screen, then tap “Chats” and “Display.” From there, you can toggle on the “Dark Mode” switch to enable the dark mode theme.
Enhancing Privacy and Security
Activating Two-Step Verification
Two-step verification is a security feature that requires you to enter a six-digit PIN in addition to your password in order to log in to your WhatsApp account. To activate two-step verification, simply tap the “Settings” button in the chats screen, then tap “Account” and “Two-step Verification.” From there, you can follow the on-screen instructions to set up two-step verification.
Backing Up Your Chat History
Backing up your chat history is a great way to ensure that your important conversations and files are safe in case your phone is lost or damaged. WhatsApp automatically backs up your chat history to Google Drive every night, but you can also manually initiate a backup by tapping the “Settings” button in the chats screen, then tapping “Chats” and “Chat Backup.” From there, you can tap “Back Up Now” to initiate a manual backup.
Blocking a contact is a quick and easy way to stop them from sending you messages and calls. To block a contact, simply tap and hold on their chat in the chats screen, then tap “Block.” From there, you can choose to block the contact or report them to WhatsApp if they are spamming you or engaging in inappropriate behavior.
The pp can also help you improve your productivity by allowing you to communicate quickly and easily with others, access information and files on the go, and more. Here are a few productivity tips that you can try:
Quickly Responding to Messages with Quick Replies
Quick replies are pre-written responses that can be used to quickly respond to messages without having to type out a response. To create a quick reply, simply tap the “Settings” button in the chats screen, then tap “Quick Replies.” From there, you can create a new quick reply by typing out the response and tapping “Save.”
Sending and Receiving Files
WhatsApp allows you to send and receive a variety of files, including photos, videos, documents, and more. To send a file, simply tap the “Attach” button in a chat, then select the type of file you want to send. To receive a file, simply tap on the file in the chat to download it.
WhatsApp has a number of shortcuts that you can use to quickly navigate the app and access important features. For example, you can quickly access the camera by swiping right from the chats screen, quickly search for chats by swiping down from the top of the chats screen, and quickly access the status bar by swiping up from the bottom of the chats screen.
These are just a few of the many tips and tricks that you can use to get the most out of WhatsApp. By mastering these features, you can enjoy a more organized, personalized, secure, and productive WhatsApp experience.
Customizing Your WhatsApp Experience
Changing Wallpapers
You can personalize your WhatsApp chats by changing the wallpapers. To change the wallpaper, simply tap the “Settings” button in the chats screen, then tap “Chats” and “Chat Wallpaper.” From there, you can select a pre-installed wallpaper or choose an image from your phone’s gallery.
You can customize the notifications for WhatsApp by changing the tone and vibration. To change the notification tone, simply tap the “Settings” button in the chats screen, then tap “Notifications” and “Notification Tone.” From there, you can select a new tone. To change the vibration pattern, simply tap “Vibrate” and select a new pattern.
Archiving Chats
Archiving chats is a great way to declutter your chats screen and keep important conversations within reach. To archive a chat, simply swipe left on the chat in the chats screen and tap “Archive.” To view archived chats, simply tap the “Archived Chats” option in the chats screen.
Muting Chats
Muting chats is a great way to silence notifications from specific chats. To mute a chat, simply tap and hold on the chat in the chats screen, then tap “Mute.” From there, you can select the duration for which you want to mute the chat (e.g., 8 hours, 1 week, etc.).
Using WhatsApp on Multiple Devices
Syncing WhatsApp across devices
WhatsApp allows you to sync your chats and settings across multiple devices. To do this, simply log in to your WhatsApp account on each device using the same phone number. Your chats and settings will automatically be synced across devices. This is a great feature for people who use multiple devices, as it allows them to stay connected and up-to-date no matter where they are.
WhatsApp Web is a feature that allows you to use WhatsApp on your computer. To use WhatsApp Web, simply open your browser, go to web.whatsapp.com, and scan the QR code using the WhatsApp app on your phone. Once you’ve scanned the QR code, you’ll be able to use WhatsApp on your computer just as you would on your phone. This is a great feature for people who want to use WhatsApp while they work or play on their computer.
Using the desktop app
The WhatsApp desktop app is a standalone app that you can download and install on your computer. The app provides a full-featured WhatsApp experience, complete with all the features and functions that you would expect from the mobile app. To use the desktop app, simply download it from the WhatsApp website and install it on your computer. Once you’ve installed the app, simply log in using your phone number, and you’re good to go.
Final Thoughts
In this article, we’ve covered a number of tips and tricks that you can use to get the most out of WhatsApp. From customizing your experience to using the app on multiple devices, there’s a wealth of features and functions that you can explore and take advantage of.
So if you’re looking to improve your WhatsApp experience, be sure to try out these tips and tricks, and see how they can enhance your communication and productivity. Whether you’re using WhatsApp for personal or professional reasons, these tips and tricks can help you get the most out of the app.
WhatsApp is one of the most popular messaging apps in the world, used by millions of people every day to stay in touch with friends, family, and colleagues. With so much personal information being shared on the app, it is important to take steps to protect your privacy and security. In this article, we’ll provide you with a comprehensive guide to the ultimate guide to WhatsApp privacy and security settings.
Overview
This article will cover all the essential privacy and security settings on WhatsApp, including how to secure your account with two-step verification, how to use end-to-end encryption, and how to manage group privacy settings. We’ll also cover how to report spam or suspicious activity on WhatsApp. By the end of this article, you’ll have a good understanding of how to protect your privacy and security on WhatsApp.
Understanding WhatsApp Privacy Settings
The first step in protecting your privacy on WhatsApp is to understand the privacy settings available on the app.
Profile Information
Your profile information, including your profile picture, status, and name, are visible to your contacts. If you’re concerned about your privacy, you can choose to keep your profile information private by going to “Settings” > “Account” > “Privacy” > “Profile Photo”, “About”, and “Status”.
Last Seen, Online Status, and Read Receipts
The “Last Seen”, “Online”, and “Read Receipts” settings determine who can see when you were last online and if your messages have been read. To manage these settings, go to “Settings” > “Account” > “Privacy” > “Last Seen”, “Online”, and “Read Receipts”.
Blocking Contacts
If you no longer want to receive messages from a contact, you can block them. To block a contact, go to “Settings” > “Account” > “Privacy” > “Blocked Contacts” and add the contact you want to block.
Two-step verification is an extra layer of security that helps protect your account from unauthorized access. When you set up two-step verification, you’ll be required to enter a six-digit code in addition to your password each time you log in to WhatsApp.
Setting up Two-Step Verification
To set up two-step verification, go to “Settings” > “Account” > “Two-step verification” and follow the on-screen instructions.
Importance of Two-Step Verification
Two-step verification helps protect your account from unauthorized access by requiring an additional code in addition to your password. This makes it more difficult for someone to gain access to your account if they have your password.
End-to-End Encryption in WhatsApp
End-to-end encryption is a security feature that ensures that only the sender and recipient of a message can read it. End-to-end encryption is automatically enabled on WhatsApp, so you don’t have to do anything to turn it on.
End-to-end encryption works by encrypting a message before it leaves the sender’s device and only decrypting it on the recipient’s device. This means that even if someone intercepts the message, they won’t be able to read it.
Benefits of End-to-End Encryption
End-to-end encryption helps protect your messages from being intercepted by third-parties. This can be especially important when sharing sensitive information, such as financial information or personal details.
Groups on WhatsApp can be a great way to stay in touch with friends, family, and colleagues, but it’s important to be mindful of who you’re sharing information with.
Group Invitations
By default, anyone in a group can add people to that group. If you’re concerned about who can add people to your group, you can change this setting by going to “Settings” > “Account” > “Privacy” > “Groups” and selecting “My Contacts” or “Nobody”.
Leaving or Deleting a Group
If you no longer want to be part of a group, you can either leave the group or delete it. To leave a group, simply tap and hold the group name and select “Exit Group”. To delete a group, you’ll need to be the group admin.
Group Settings
You can also manage the privacy settings for individual groups by tapping and holding the group name, selecting “Group Info”, and then “Group Settings”. Here, you can choose who can add you to the group, who can see the group description, and more.
How to Report Spam or Suspicious Activity on WhatsApp
If you receive a message that you believe is spam or suspicious, it’s important to report it.
Reporting Spam or Suspicious Activity
To report a message as spam or suspicious, simply tap and hold the message and select “Report”.
Importance of Reporting Spam or Suspicious Activity
Reporting spam or suspicious activity helps keep WhatsApp a safe and secure place for everyone. By reporting messages that you believe are spam or suspicious, you’re helping to protect the community and ensure that everyone can use it safely.
Final Thoughts and Recommendations
In this article, we’ve provided you with a comprehensive guide to the ultimate guide to WhatsApp privacy and security settings. We’ve covered everything from understanding privacy settings to securing your account with two-step verification and end-to-end encryption, to managing group privacy settings and reporting spam or suspicious activity.
The app is one of the most popular messaging apps in the world, and it’s important to take steps to protect your privacy and security. By understanding the privacy and security settings available on WhatsApp, securing your account with two-step verification, and using end-to-end encryption, you can ensure that your messages and personal information stay safe.
It’s important to be mindful of your privacy and security when using any online service, and WhatsApp is no exception. By following the tips and advice in this article, you can help keep your information safe and secure on WhatsApp.
WhatsApp is a widely used instant messaging app that enables users to communicate with friends, family, and contacts from all over the world. Over the years, it has evolved from a simple messaging app to a full-fledged communication tool. In recent years, businesses have started to adopt WhatsApp as a way to communicate with customers and provide customer support.
In this article, we will provide a comprehensive guide on how to use WhatsApp for business purposes. From setting up a business account to automating customer support and integrating with other business tools, this guide will cover everything you need to know to get started with using WhatsApp for your business.
Setting up a WhatsApp Business Account
Creating a WhatsApp Business Account Guide
The first step in using WhatsApp for business purposes is to set up a business account. To create a WhatsApp Business account, you need to download the WhatsApp Business app from the Google Play Store or Apple App Store. Once you have downloaded the app, you can create a business account by entering your business phone number and following the prompts to verify your account.
After entering your business phone number, you will receive a verification code via SMS. Enter this code into the app to complete the verification process. Once your phone number has been verified, you will be able to use your WhatsApp Business account to communicate with customers.
Completing Your Business Profile
The next step is to complete your business profile by providing information about your business, including your business name, address, and description. You can also add a profile picture and cover photo to make your profile more appealing to customers. This information will be displayed to customers who view your business profile, so it’s important to make sure that it’s accurate and up-to-date.
Best Practices for Using WhatsApp for Business
Responding to Customer Inquiries
One of the main ways businesses use WhatsApp is to respond to customer inquiries. To ensure that you are providing excellent customer support, it’s important to respond to customer inquiries in a timely manner. It’s also a good idea to use a friendly and professional tone in your responses.
In addition to responding to customer inquiries, businesses can use WhatsApp to provide customer support. This can include providing answers to frequently asked questions, resolving customer issues, and assisting with product or service-related questions. To provide effective customer support, it’s important to be knowledgeable about your products or services and to have processes in place for resolving customer issues.
Sending Updates and Promotions
WhatsApp business can also be used to send updates and promotions to customers. For example, you can use it to send notifications about sales, new product launches, or special offers. When sending updates and promotions, it’s important to make sure that the information you’re sharing is relevant and valuable to your customers.
Using WhatsApp for Order Processing and Delivery Updates
Another way businesses can use WhatsApp is to process orders and provide delivery updates. This can include confirming orders, providing shipping information, and updating customers on the status of their deliveries. By using WhatsApp for order processing and delivery updates, businesses can provide a more personalized and convenient experience for customers.
Automating Your WhatsApp Business Account
Introduction to Chatbots
A chatbot is a software program that uses artificial intelligence to communicate with customers. By using a chatbot, businesses can automate the customer support process and provide quick and efficient responses to customer inquiries.
Benefits of Using Chatbots for Business
Using a chatbot can help businesses save time and resources by automating customer support. Chatbots can also provide 24/7 customer support, which can help to improve the customer experience. In addition, chatbots can handle a large volume of customer inquiries, which can help businesses to scale their customer support operations.
Setting up a Chatbot for Your WhatsApp Business Account
To set up a chatbot for your WhatsApp Business account, you need to choose a chatbot platform and integrate it with your WhatsApp account. There are many chatbot platforms available, including Chatfuel, Tars, and ManyChat.
When choosing a chatbot platform, it’s important to consider factors such as ease of use, customization options, and integrations with other business tools. You should also test the chatbot to make sure that it provides accurate and efficient responses to customer inquiries.
Best Practices for Using Chatbots for Business
When using a chatbot for your business, it’s important to keep the following best practices in mind:
Provide clear and concise answers to customer inquiries
Use a friendly and professional tone in your responses
Continuously monitor and update your chatbot to ensure accuracy and efficiency
Provide customers with the option to speak with a live agent if needed
By following these best practices, businesses can ensure that their chatbots provide a positive customer experience and effectively automate their customer support process.
Measuring the Success of Your WhatsApp Business Account
Introduction to Metrics
Measuring the success of your WhatsApp Business account is essential to understanding the impact of your efforts and making improvements where necessary. There are several key metrics that businesses should track to evaluate the success of their WhatsApp account.
Key Metrics to Track
Some of the key metrics that businesses should track include:
Open rate: the percentage of messages that are successfully delivered to customers
Response rate: the percentage of customers who respond to your messages
Conversion rate: the percentage of customers who take a desired action (e.g. make a purchase, request more information) after receiving a message from your business
Customer satisfaction: an overall measure of customer satisfaction with your business’s WhatsApp account
Best Practices for Tracking Metrics
To effectively track metrics, businesses should:
Choose a reliable tracking tool to accurately measure and analyze data
Set clear goals and objectives for your WhatsApp account and track progress towards these goals
Continuously monitor and analyze your metrics to identify areas for improvement
Make data-driven decisions to optimize your WhatsApp account and achieve better results
By tracking the right metrics and following best practices, businesses can gain a deeper understanding of the impact of their WhatsApp account and make informed decisions to improve its performance.
How To Apply For WhatsApp Business
Conclusion
In conclusion, using WhatsApp for business can provide a range of benefits, including improved customer support and increased customer engagement. By following the tips and best practices outlined in this guide, businesses can effectively use WhatsApp to achieve their business goals and provide a better customer experience. Whether you are just starting to use WhatsApp for business or looking to optimize your existing account, this guide provides the information and tools you need to succeed.
WhatsApp is a popular instant messaging app that allows users to send text messages, make voice and video calls, and share photos and videos. One of the great features is the ability to change the theme of the app, giving users the ability to personalize their experience. In this article, we will be discussing how to change themes on WhatsApp, the available themes, and where to find additional themes.
Why changing WhatsApp themes?
Changing the themes can add a personal touch to the app and make it more visually appealing. The ability to customize the look and feel of the app can also make it more enjoyable to use.
Additionally, the dark mode theme can reduce eye strain and make it easier to use it in low-light conditions. Not only that, by changing the theme can also reflect one’s personality and preferences. Overall, changing the theme can enhance the user experience and make it more enjoyable.
Is it safe to change these themes?
In general, it is safe to change themes on WhatsApp, as the app is developed by a reputable company and the themes available through the app’s built-in theme selection are safe to use. However, it is important to be cautious when downloading themes from third-party websites or apps.
These themes may not be developed by reputable sources and could potentially contain malware or other security threats. To avoid these risks, it is recommended to download themes only from trusted sources, such as the official WhatsApp website or the Google Play Store or Apple App Store. It is also important to make sure you have a good security software that can detect and prevent any malicious activity.
Additionally, if you’re going to apply a theme from third party sources, make sure that you are downloading from a reputable source and the theme is compatible with the latest version of the App. It’s also a good idea to check for reviews and ratings of the theme before downloading it.
How To change themes on WhatsApp
The process is relatively simple. The steps are slightly different for Android and iOS devices, so we will go through them separately.
For Android Devices:
Open WhatsApp and go to the “Settings” menu.
Tap on “Chats” and then “Theme.”
Here, you will see a selection of pre-installed themes to choose from.
Select the theme you want to use, and it will be applied to your WhatsApp.
In addition to the pre-installed themes, WhatsApp also allows users to customize their own theme. To do this, simply go to the theme selection menu, and tap on “Custom.” From here, you can select a background color or upload your own image as the background. You can also change the font color and style.
The App has a variety of pre-installed themes to choose from, including a light theme and a dark theme. The app also offers several colorful themes, such as blue, green, and pink. Additionally, WhatsApp also has seasonal themes that are updated regularly.
If you’re looking for more theme options, there are several third-party websites and apps that offer additional themes for it. However, it’s important to note that downloading themes from untrusted sources can put your device at risk of malware and other security threats. Therefore, we recommend downloading themes from reputable sources only.
Search “WhatsApp” in the search bar at the top of your screen and select the application when it appears in search results. Click install and wait as the App downloads onto your device.
Once downloaded, open up WhatsApp and create an account using either your phone number or email address to get started.
In conclusion, changing the theme on WhatsApp is a simple process that can be done in a matter of minutes. Whether you prefer a light or dark theme, the App has a variety of pre-installed themes to choose from. Additionally, you can customize your own theme and even find more options from reputable sources. Experiment with different themes to personalize your WhatsApp experience and make it unique.